Updating cases
Accessing existing cases
In order to work on a case, you need to open it first. There are several ways to open an existing case:
- Opening a case from the case list or grid.
- Opening a case from the Quick Search results.
- Opening a case from a result table containing cases (e.g., on a contact page, in the section for related cases of a resource page, or in the Detailed Search).
- Opening a case using the Jump to case link in the section for related cases of another case.
Becoming the assignee
Being the assignee means that you are in charge of the case at this moment. Cases can be assigned to a user manually and automatically.
Automatic assignments are configured by your CM administrator. Therefore, they depend on the configuration of your individual CM system, e.g., you might get assigned as the case's assignee when you execute a certain workflow activity or when you create a case.
Manual assignments can be performed in several ways:
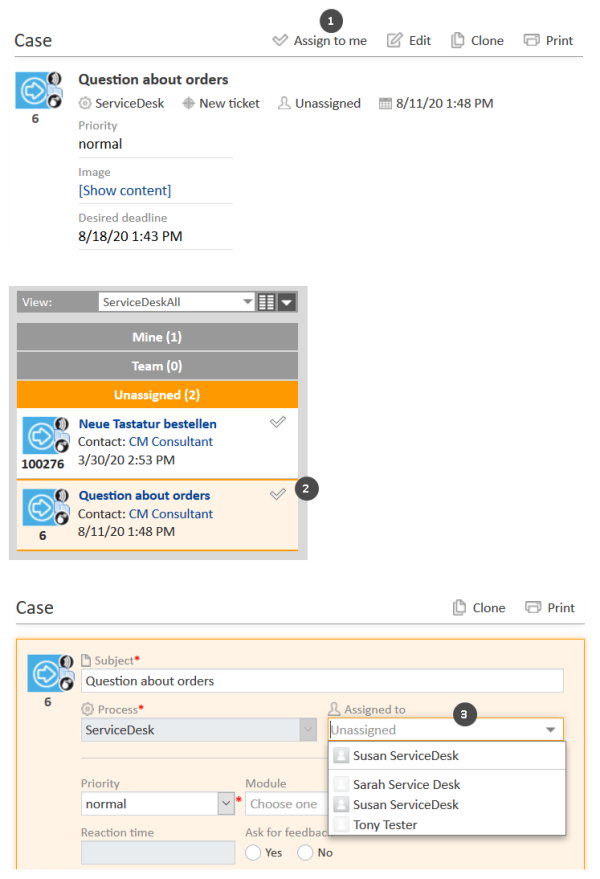
- (1) Accepting a case in the case header (only unassigned cases, only assignment to yourself)
Click Accept in the case header. - (2) Accepting a case in the case list (only unassigned cases, only assignment to yourself)
Click the checkmark icon in the upper right corner of the case in the case list. - (3) Changing the assignee of a case (any case, assignment to yourself or another user)
Click Edit to make the case data editable. Then, select a user from the Assigned to drop-down list. If the case is already assigned to a user, you have to remove the user's name first by clicking the red cross next to the name.You can only change the assignee if you have the required permission.
Figure 58: Accepting a case
Note regarding manual assignments using (1) and (2)
If you are currently representing the user who is assigned to the case, you can accept the case using the Accept button (1) or the checkmark icon (2) even though the case is already assigned.
The CM system might send you an email when you are added or removed as an assignee. The exact behavior depends on the configuration of your system.
Editing case data
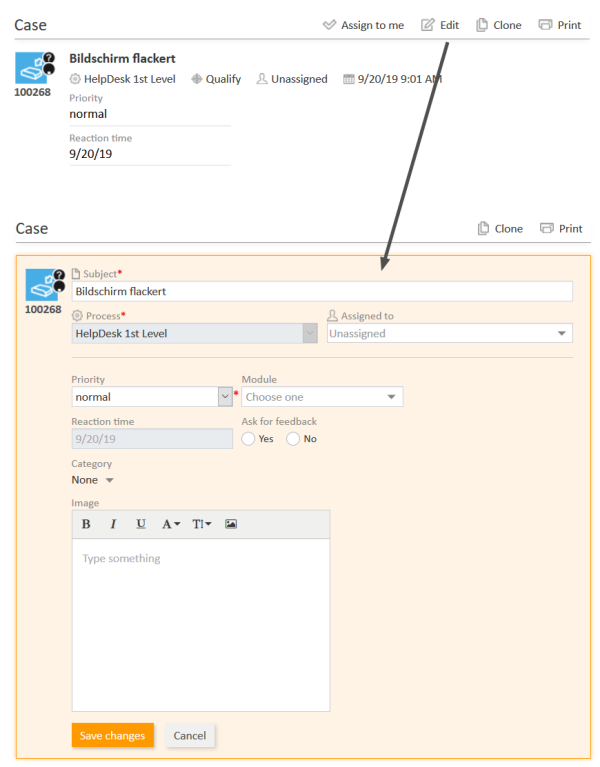
You can edit case data in the case header and in the details section. Click the Edit link in the upper right corner of the desired section to edit its data. The section's background turns yellow to indicate that it is in edit mode. Edit the case data as required (see Data fields for details about the different types of data fields). Click Save changes to save the new data. The section background turns gray again (view mode).
Figure 59: Editing case data
You can only edit case data if you have the required permission.
Performing basic actions
Cloning a case
You can clone a case to quickly create a new case which is very similar to an existing case. Usually, the case data (case header and details section) and the contact data (main contact and additional contacts) are copied from the original case to the cloned case. Other content such as attachments, comments, emails, and time bookings are not copied to the new case. There is no case relation or other technical connection between the two cases. Click the Clone link in the upper right corner of the case to duplicate it. The cloned case is opened in edit mode. Change its data as required and add a comment. Click Create to save the new case.
The exact behavior of the cloning feature, i.e., which content is copied to the new case, depends on the individual configuration of your CM system.
Printing a case
You can print a case by clicking the Print link in the upper right corner of the case. A pop-up window is displayed where you can select the desired printer.
Performing workflow activities
Workflow activities are used to move cases through the business process. The available workflow activities depend on the business process (workflow) implemented in your CM system.
The displayed workflow activities depend on:
- the case opened in the main working area
- the current process of the case
- the current position of the case within the workflow
- your permissions
- if you are added as an additional assignee to the case
- the case status
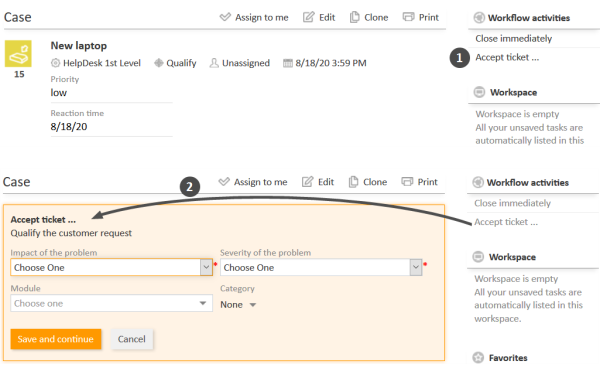
Open the case in the main working area to display the workflow activities which you can carry out for this particular case in this moment. The available workflow activities are displayed on the left, in the Workflow activities box (1). Click a workflow activity to execute it. This will have one of the following effects:
- The workflow activity is executed immediately. You see the next workflow activities according to the new position of the case in the business process.
- An ACF (Activity Control Form) opens (2). You have to fill out the ACF before the workflow activity can be executed.
- You see an info message that certain criteria are not fulfilled yet, e.g., you might have to fill out certain data fields or perform certain actions before you can execute a workflow activity.
In the following cases, no workflow activities are displayed:
- The business process for this case is already completed, i.e., the case is closed, and there is no reopen activity.
- The workflow activities at this point in the business process depend on conditions which are not yet fulfilled.
- You do not have the permissions needed to see the workflow activities at this point.
Figure 60: Workflow activities and ACF
Filling in an ACF
Workflow activities can be configured to open an ACF (Activity Control Form). ACFs are used to update case data. They allow you to easily locate the fields which you need to fill out in order to perform this workflow activity. It depends on the individual configuration of your CM system which ACFs are available. Examples for the usage of ACFs are workflow activities where you qualify a workaround, enter the feedback received by a contact, or prepare a quote.
The ACF is displayed above the Case Header. It has a yellow background to indicate that it is editable. You have to fill in the data in the ACF before you can continue. Click Save and continue to save your changes and execute the workflow activity. If you click Cancel, the case will remain in its previous position, i.e., the workflow activity is not executed.


