CM/Track
CM/Track, also called portal, is a web application which you can open in a browser. It is the primary access point to the system for external users. These can be either customers, or colleagues who do not work with the Web Client. CM/Track allows the external users to create requests and check their status. The users only have access to their own data.
User interface
On your first access to CM/Track, a pre-login page which you can bookmark is shown, and you need to click the Access login page button. Select Skip this page in the future to go directly to the login page on subsequent logins in the same browser. You can log in to CM/Track by providing your username and password.
If two-factor authentication is enabled, you will receive an email with a confirmation code after entering your username and password. You need to enter this code for logging in.
After logging in, the welcome page is displayed.
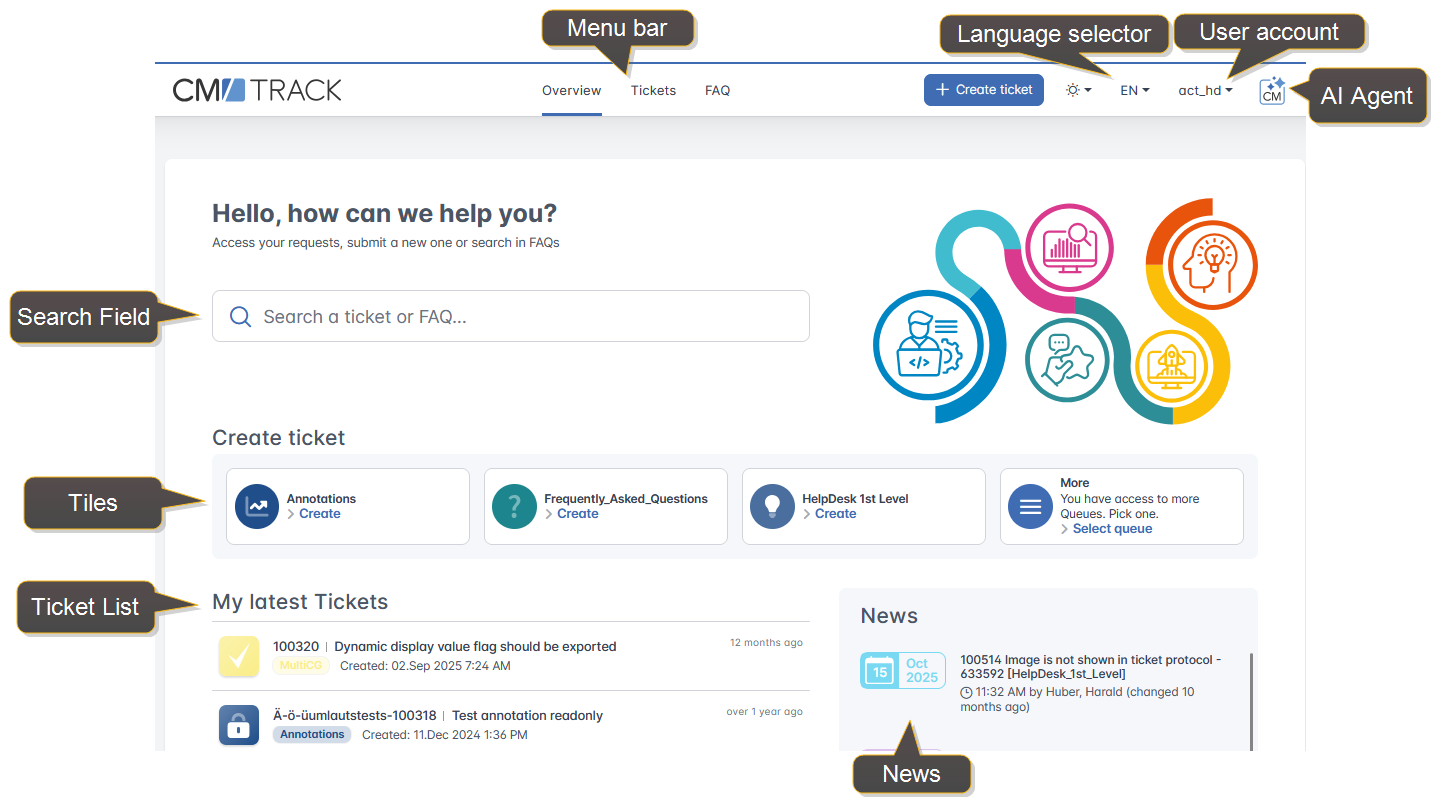
The welcome page contains the following elements:
- Menu bar: Contains the links to open your tickets, create a new ticket and consult the FAQ tickets.
- Language selector: Allows you to change the language of CM/Track. It is displayed between the light/dark mode selector and the user account if several languages are available.
- User account: Allows you to edit your personal contact information, change your password or log out, see Editing your contact data and Managing your password.
- AI agent: Opens a sidebar where you can ask the AI agent for assistance, see Using the AI agent. This feature is only displayed if it is available in your portal.
- Search field: Allows you to search for your tickets.
- Tiles: Provides direct access to the pages for creating tickets in the given queues, see Creating a ticket.
- Ticket list: Shows your latest 10 tickets.
- News: Shows news whose text you can view by clicking the header of the respective entry.
You can click the CM/Track logo in the upper left corner to return to the welcome page when another page is open.
Viewing your tickets
Click the Tickets link in the menu bar to open the ticket list. It shows basic data of your tickets and includes several options for filtering and sorting. In some cases, you might also see the tickets of other contacts of your company.
Filter criteria:
- Ticket owner: Choose if you want to display only your own tickets or also the tickets of your company (depends on your permissions).
- Queue: Choose the queue which the tickets belong to.
- Scope: Choose the scope for a selected queue.
- Status: Choose if you want to view only open or closed tickets or both.
Sort criteria:
- Queue
- Creation date
- Subject
- ID
- Scope
- Last modification date
Click the button with the arrow next to the selector to change the sorting order.
In addition, you can enter a search term into the search field on the left to show only the tickets which contain the search term in the ticket number, subject, comments, attachments or ticket fields.
Click the row of a ticket to view its details. You can return to the ticket list by clicking Tickets in the menu bar or using the browser back button.
Creating a ticket
You can create a new ticket by selecting the desired tile on the welcome page or in the window opened when clicking the Create ticket button in the menu bar. Some fields might already be prefilled according to the selected tile. Fill out the remaining fields, enter a comment, and add an attachment if needed. Click the Create ticket button at the bottom of the window to save the new ticket.
Duplicating a ticket
If the duplication feature is available in your portal, you can create a new ticket based on an existing ticket.
Open the ticket which you want to duplicate and click the Duplicate button in the ticket header. The ticket creation form opens with the ticket fields prefilled using the data from the existing ticket. Review the prefilled information and modify or complete the fields as needed. You can also enter a comment and add attachments. Click Create ticket to create the new ticket.
Modifying a ticket
You cannot modify the data fields of existing tickets in CM/Track but you can add a comment or an attachment to a ticket, and perform activities for a ticket.
To add a comment or an attachment click the Add a comment / attachment button in the ticket:
- Enter a comment in the rich text editor.
- Add an attachment by dragging-and-dropping it in the Drop files or click to select files area. Alternatively you can click this area to select a file from the file system. It is possible to add several files at once.
Click the Save button to save your changes.
If available, you can perform activities in CM/Track to move tickets to the next step in the business process or provide additional data. The available activities are located on the right of the ticket. To perform an activity just click on it. If the activity has a form, the form is displayed after clicking the activity. You have to fill out the form and click Save. Required fields which must be filled out are indicated by a red asterisk. If you cancel the form, the activity is not executed. A green success message is displayed after the activity has been executed successfully.
Searching the FAQ
FAQs (Frequently Asked Questions) help you find answers to common questions by yourself. FAQs are special tickets which are visible to all customers in CM/Track. They can contain solutions to known problems or instructions on common tasks.
Click the FAQ link in the menu bar to open the FAQ page. It contains a search field and a selection field with all available FAQ lists. Select a FAQ list, enter a search pattern and click the Search button. You can use an asterisk (*) as a wildcard in the search pattern.
The matching tickets are shown in the ticket list below the search field. You can click a ticket to view its details.
Using the AI agent
If the AI agent is available in your portal, its icon is displayed in the upper right corner of the menu bar. Click the icon to open the AI agent in a sidebar.
Enter a message in the field at the bottom of the sidebar and send it to start a conversation. The sidebar shows your messages and the agent's replies. You can start a new conversation, close the sidebar or cancel the processing of your latest message. Drag the handle in the middle of the sidebar to adjust its width.
The AI agent can help you search for information and perform certain actions in CM/Track.
- Search the FAQs: Describe your problem or question to the AI agent. The agent searches the available FAQ tickets and replies with a summary of relevant information which might help you solve your request.
- Search your tickets: Describe the information you are looking for in your own tickets. The agent searches your tickets and replies with the relevant information.
- Creat a ticket: Describe the request for which you want to create a ticket. Review the summary provided by the agent and click Prefill ticket. The ticket creation form opens with the information provided by the agent. Check the prefilled information, complete or modify it as needed, and click the regular Create ticket button to create the ticket.
- Adding a comment: Tell the agent which comment you want to add and specify the ticket. The agent adds the comment to the ticket automatically. If the ticket is already open, click Reload in the sidebar to display the new comment. If the ticket is not open, click Go to ticket to open it.
Editing your contact data
If this feature is available in your portal, you can update your personal contact information directly in CM/Track.
Open the user account menu in the upper right corner and select Edit my data. A modal window containing the available contact fields is displayed. Modify the desired information and click Save.
The displayed fields depend on the configuration of your portal. Some fields might be read-only and cannot be changed.
Changing the language
If several languages are available in your portal, a language selector is displayed in the menu bar between the light/dark mode selector and the user account.
The selector displays the short code of the current language, for example EN or DE. Click the language code to open the selector and see the full names of the available languages. Select the desired language to change the language of CM/Track.
By default, CM/Track uses the language of your browser. You can select another language after logging in.
The language selector is only displayed if more than one language is configured for the portal.
Managing your password
You can change your password in two ways:
- If you forgot your password, you can click the Forgot your password? link on the log in page. Enter your username in the field provided on the next page and click OK. You will receive an email with instructions on how to reset your password.
- If you still know your password but want to change it, you can click your username on the right side of the menu bar, and select the Change password option. Enter your old and your new password and confirm your new password in the respective fields. Click the Change password button to save the new password.