Setting Up the Customer Data Model
Introduction to Setting Up the Customer Data Model
You can implement various customer data models. Please refer to section Introduction to Customer Data Models for a detailed introduction. To work with a new customer data model within a certain customer group (or in several customer groups), the following steps have to be performed:
- Create a customer data model.
(This implies you have already decided whether this should be a one- or a two-level data model. In this example, we will create a two-level model.) - Create a new customer group.
- Assign the customer data model to the group.
A customer data model comprises objects on three model levels:
- The customer data model definition
- The customer objects within this model
A customer object can be of one of two types:- Company
E.g., an institution, but can also be a machine, a ship, or anything else which represents the company level. - Contact
E.g., a person, but can also be a machine, a hardware device, a product, or anything else which represents the contact level.
If a company level is present, the contact is a sub-level of the company. For a simple customer data model, use only the contact object or only the company object.
- Company
- The customer fields
These are the data fields for the customer objects, i.e., either the customer fields for company data (e.g., ZIP, address, phone) or the customer fields for contact data (e.g., surname, name, email address).
Managing Contacts and Companies Using the Admin Tool
To manage components of the customer data model, use the items in the navigation group Customers in the Admin Tool. Open the navigation item Data Models to set up a new data model or to edit existing models.
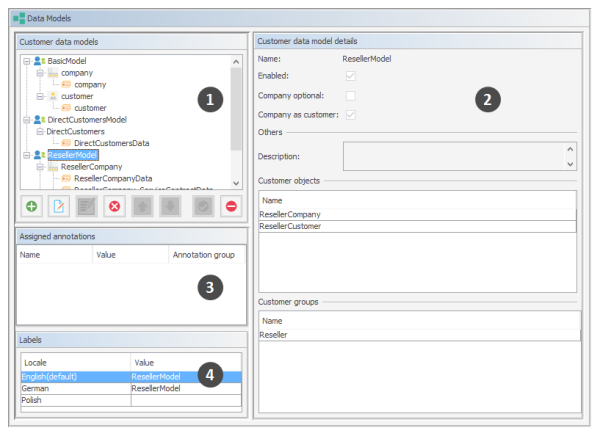
Figure 103: ConSol CM Admin Tool - Customers, Data Models: Customer data model definition
The figure shows the following sections:
- tree of all components of all customer data models (1)
- details of the selected component (2)
- annotations for customer field groups of a data model, empty for data models or if no group is selected (3)
- labels for the selected component (4)
To explain how to work with the customer data model, we will walk you through an example in the next sections.
Creating a New Two-Level Customer Data Model
To create a new customer data model you have to create the objects on all levels of the data model. In the following example, we will build a customer data model for partner data. We will create a customer data model with a company and a contact object, i.e., we will have to create the following objects:
- the customer data model itself
- the company object (1st level)
- the customer fields for the company
- the contact object (2nd level)
- the customer fields for the contact
After having defined an object, the parameters for this object can be (or rather should be) configured.
Step 1: Create the Customer Data Model with the First Customer Object
When you create a new customer data model, you have to add a customer object and the respective customer fields in one step.
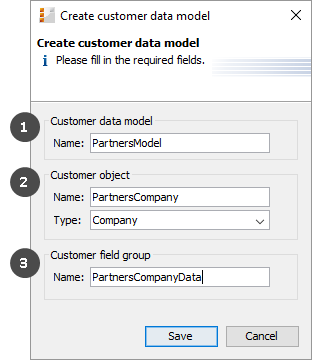
To create a new customer data model, mark another customer data model (that way you select the level on which you want to work) and use the Add button to open the pop-up window.
Figure 104: ConSol CM Admin Tool - Customers, Data Models: Creating a new customer data model
You have to fill in the following fields:
- Customer data model (1)
- Name
The name of the new customer data model. The localized names for the data model are set in the Labels section of the main Data Models panel. For details, please refer to section Localization of Data Fields.
- Name
- Customer object (2)
- Name
The unique technical name of the company/contact object. The localized names for the customer object are set in the Labels section of the main Data Models panel. For details, please refer to section Localization of Data Fields - Type
Select Contact or Company. There can be only one company object and one contact object within one customer data model.
- Name
- Customer field group (3)
- Name
The unique technical name of the first customer field group for company data within the defined customer object. More customer field groups can be added later on. The localized names for the customer field group are set in the Labels section of the main Data Models panel. For details, please refer to section Localization of Data Fields
- Name
Step 2: Create Another Customer Object
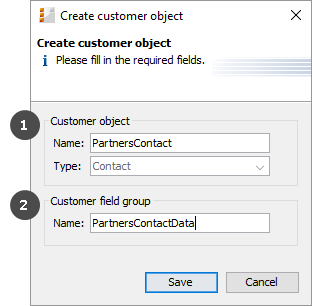
In the next step, you have to add the contact object. Select the object PartnersCompany (to set the correct level for the following Add operation) and click the Add button to open the pop-up window.
Figure 105: ConSol CM Admin Tool - Customers, Data Models: Adding a new customer object
You have to fill in the following fields:
- Customer object (1)
- Name
The unique technical name of the contact object. The localized names for the customer object are set in the Labels section of the main Data Models panel. For details, please refer to section Localization of Data Fields. The localized name will also be used as header of the customer page (i.e., contact or company page, see section Example 3: Using Company and Contact Page). - Type
Here, Contact is pre-selected and cannot be modified, because a company object is already present in the customer data model.
- Name
- Customer field group (2)
- Name
The unique technical name of the first customer field group for contact data within the defined customer object. More customer field groups can be added later on. The localized names for the customer field group are set in the Labels section of the main Data Models panel. For details, please refer to section Localization of Data Fields
- Name
Step 3: Configuring the Parameters for the Defined Objects
Parameters for the Customer Data Model
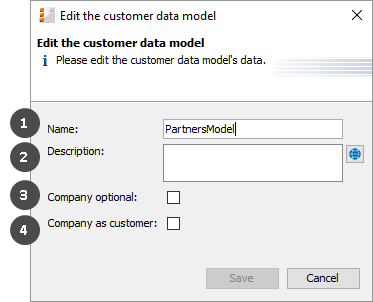
Double-click on the name of the customer data model (PartnersModel in our example) or mark the customer data model in the list and click the Edit button to open the pop-up window where you can define the parameters for the model.
Figure 106: ConSol CM Admin Tool - Customers, Data Models: Parameters for a customer data model
You can fill in the following fields:
- Name (1)
Check or modify the existing name of the model. - Description (2)
Optional description. Can be localized. Please see section Localization of Objects in General, Type 1 for details. - Company optional (3)
If this checkbox is checked, it is possible to add a contact to a ticket without the contact being part of a company. The company might be set later but it is not required. So, here you can enable working with single contacts, even within a two-level customer data model. - Company as customer (4)
Check this checkbox if it should be allowed to create tickets not only for contacts, but also for companies within the model.
Parameters for the Customer Object
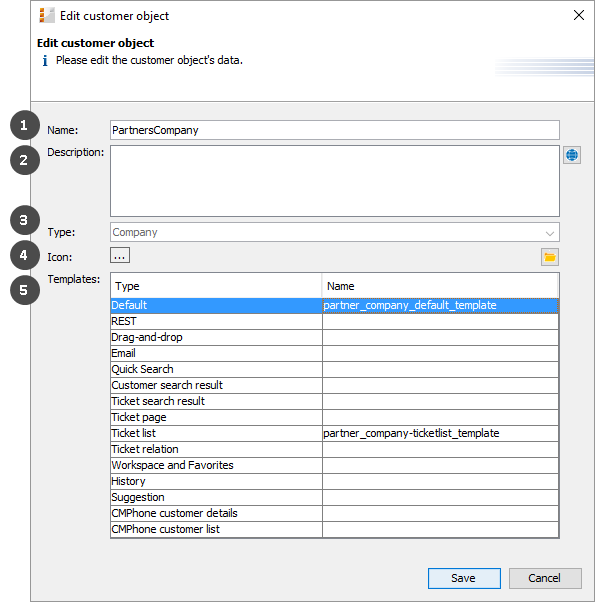
Double-click on the name of a customer object, e.g., the PartnersCompany or select the object and click the Edit button to open the pop-up menu where you can configure the parameters for this object.
Figure 107: ConSol CM Admin Tool - Customers, Data Models: Parameters for a customer object
You can fill in the following fields:
- Name (1)
The unique technical name of the customer object with technical name and localized name(s). The localized name will also be used as header of the customer page (i.e., contact or company page, see section Example 3: Using Company and Contact Page). - Description (2)
The description of the customer object. Will be used in future ConSol CM versions. Can be localized. Please see section Localization of Objects in General, Type 1 for details. - Type (3)
A read-only field which displays the type (contact or company) of the customer object. - Icon (4)
The icon for all companies within this model. It will be displayed in the Web Client. You can either use one of the standard CM icons using the button (...) or upload an icon using the File explorer button. - Templates (5)
The templates which are used to render the data of the customer object, i.e., the templates which define the data fields that are displayed in the Web Client for objects of this type. There are various positions in the GUI for which the layout of the company or contact data can be defined. The templates are stored in the Script and Template section of the Admin Tool. Please see section Templates for Customer Data for a detailed explanation.
Parameters for the Customer Field Group
Double-click on the name of the customer field group to change the technical name (only possible when respective fields in the customer data sets are empty) or to assign/unassign Dependent Enum Scripts for the group.
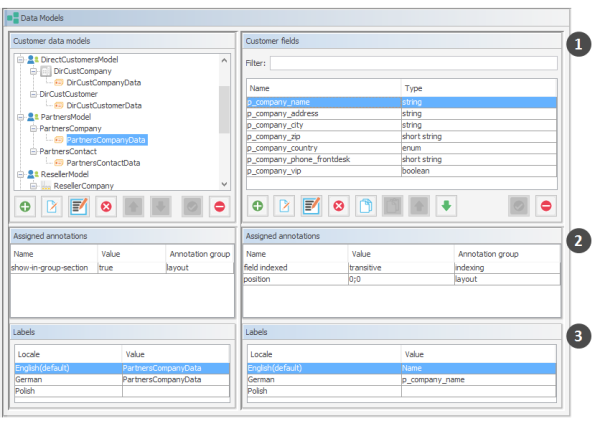
To define the customer fields, use the GUI elements on the right-hand side. In the following figure, an example for the definition of customer fields for the PartnersCompany is shown. Here, only one customer field group (PartnersCompanyData) is used. You can use as many customer field groups as you need in one customer object.
Figure 108: ConSol CM Admin Tool - Customers, Data Models: Parameters for the customer field group
The figure shows the following sections:
- list of customer fields in the selected customer field group (1)
- field annotations for the selected customer field (2)
- labels for the selected customer field (3), i.e., the localized values for the name of the customer field
The definition of customer fields within customer data models is based on the same principles as the definition of ticket fields for ticket data. For a detailed introduction to the definition and management of ticket fields, please refer to sections Ticket Fields (Setting Up the Ticket Data Model) and Customer Field Management and GUI Design for Customer Data.
The available customer field annotations are listed in section Annotations. The annotation unit is a contact is no longer in use because the level of a unit (i.e., the company or contact) is defined by its unit type (company or contact).
Please make sure that the annotation field indexed is set for all fields which should be searchable. This affects the Quick Search, Detailed Search, and all auto-complete operations! See also section Search Configuration.
Congratulations! When you have completed all the steps in the previous sections, you have created a new ConSol CM customer data model and can now go on to assign the model to one or more customer group(s).
Creating a New Customer Group Using the New Customer Data Model
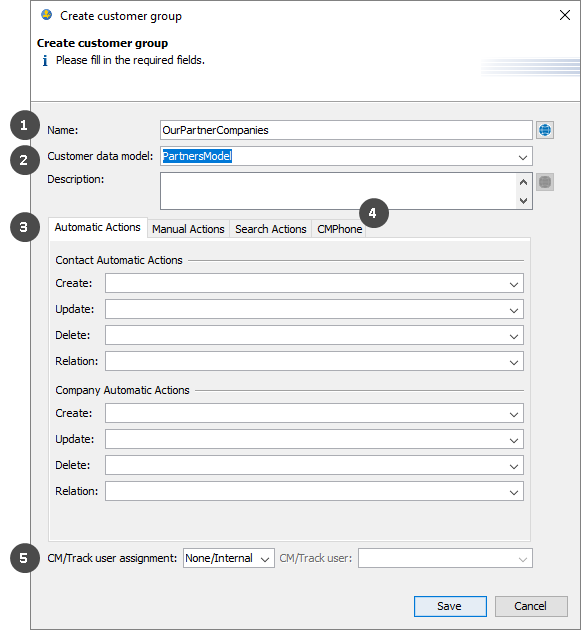
When the customer data model has been defined, it can now be assigned to one or more customer groups. In the example, we will create the new customer group OurPartnerCompanies which will use the new PartnersModel.
Use the navigation item Customer Groups in the navigation group Customers of the Admin Tool to create a new customer group and to assign the desired customer data model.
Figure 109: ConSol CM Admin Tool - Customers, Customer Groups: Definition of a new customer group
You can fill in the following fields:
- Name (1)
The unique technical name (and localized name) of the new customer group. Can be localized. Please see section Localization of Objects in General, Type 1 for details. - Customer data model (2)
Select the desired data model from the drop-down menu. - Automatic/Manual/Search Actions (3)
On those tabs you can assign customer actions. This is explained in detail in section Action Framework - Customer Actions. - CMPhone (4)
This tab will only be displayed if CM/Phone is installed. Please see section CM/Phone: CTI with ConSol CM for details. - CM/Track user assignment (5)
Select the assignment mode of the CM/Track user profile. Please see section Defining the User Assignment Mode for further information.
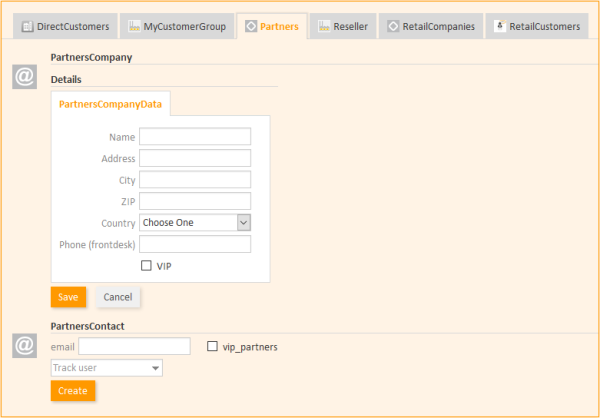
An engineer who has access permissions for six customer groups will see the following in the Web Client.
Figure 110: ConSol CM Web Client - Creating a new company and contact
Assigning Access Rights for Customer Groups with the New Model to Roles
In order to let engineers work with customer data from the new customer group, i.e., to create new partner data sets or to modify existing sets, you have to grant access permissions for the customer groups to one or more roles.
See section Tab Customer Group Permissions.
Assign the New Customer Groups to Queues
Please keep in mind that you have to assign the new customer group to all queues where tickets should be created for customers of this group. See section Queues for details.
Deactivate Objects in the Customer Data Model
You can only deactivate an entire customer data model. It is not possible to deactivate company or contact objects or customer field groups. The button to deactivate these objects is present, but takes no effect.
