Tips & Tricks for Working More Efficiently
Getting Tooltips
There are many locations where you can get additional information, so called tooltips, when you hover over an element in the Web Client. The tooltip usually provides a description of the element. Tooltips are used for example in:
- Ticket icon
Name of the scope and description of the overlays - Activities
Description of the activity - Links and buttons
Description of the action which can be performed by clicking the link or button

Figure 154: Tooltip for a ticket icon

Figure 155: Tooltip for a workflow activity

Figure 156: Tooltip for a button
Using Keyboard Shortcuts
ConSol CM offers specific keyboard shortcuts which allow you to execute activities. This applies to workflow activities, customer activities, resource activities and search activities. There are up to nine shortcuts available: Alt+1 for the first activity in the list, Alt+2 for the second activity, and so on.
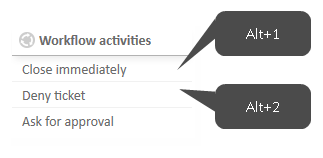
Figure 157: Keyboard shortcuts for workflow activities
In addition, you might want to use the keyboard shortcuts provided by your browser. For example, you can use the TAB key to navigate the page and the ENTER key to press a button.
The availability of the CM-specific keyboard shortcuts depends on your system configuration.
Using the Favorites
The Favorites are a box displayed to the right of the main working area. They serve as a quick access to certain items in ConSol CM. The items you add to the Favorites are saved in the Favorites independently of your session: you can still access them after logging out and logging in again.

Figure 158: Favorites
The Favorites provide quick access to:
- Tickets
- Customers
- Resources
- Detailed Searches
Adding a Ticket, Customer, Resource, or Detailed Search to the Favorites
You can add a ticket, customer, resource, or Detailed Search to the Favorites using the drag-and-drop features. Please proceed as follows to add the item to the Favorites:
- Click the icon of the respective item. This can be the ticket icon, customer icon, resource icon, or search icon.
- Drag the icon to the Favorites box and drop it there. In case of a Detailed Search, you have to enter a name for the search before you can save it to the Favorites. Tickets, customers, and resources are automatically displayed with their names according to the individual configuration of your CM system.
The following figure illustrates how to add a contact to the Favorites:

Figure 159: Adding a contact to the Favorites
Depending on the type of item, you can drag-and-drop it from several locations. For example, you can drag the ticket icon from the ticket list, the ticket header, a ticket relation, or a result table containing the ticket name and icon.
Working with the Favorites
You can carry out different actions with the Favorites:
- Opening an Item from the Favorites
- Rearranging the Items in the Favorites
- Removing an Item from the Favorites
Opening an Item from the Favorites
You can use the Favorites to open the items saved there. This can be a ticket, customer page, resource page, or Detailed Search. To do so, just click the name of the item, which is a link.

Figure 160: Opening an item from the Favorites
Rearranging the Items in the Favorites
You can change the order of the items in the Favorites by dragging-and-dropping each item to the desired position.

Figure 161: Rearranging the Favorites
Removing an Item from the Favorites
You can delete an item from the Favorites by clicking the red cross next to the item's name. The red cross is displayed as soon as you hover the mouse over the item.

Figure 162: Removing an item from the Favorites
Using the Workspace
The Workspace is a box displayed to the right of the main working area. It serves as a temporary storage for changed tickets, customers, and resources, in case you switch to another object without having saved the changes to the previous object before. The content of the Workspace is deleted when your session ends, i.e., you log out of the Web Client or you are logged out automatically.

Figure 163: Workspace
The Workspace saves your changes both for new objects, i.e., when you create a new ticket, customer, or resource, and for existing objects, i.e., when you edit a ticket, customer, or resource. If you switch to another screen while editing data, your changes will not be lost, but you can resume work later on.
Working with the Workspace
You can carry out different actions with the Workspace:
Resuming Work on an Item in the Workspace
You can resume work on an item from the Workspace by clicking its name. It will be opened in edit mode in the main working area and your unsaved changes will be present.

Figure 164: Resuming work on an item from the Workspace
Removing an Item from the Workspace
You can delete an item from the Workspace by clicking the red cross next to the item's name. The red cross is displayed as soon as you hover the mouse over the item.
![]()
Figure 165: Removing an item from the Workspace
When you log out of the Web Client or a session timeout occurs, the Workspace will be emptied automatically. You will be prompted for the decision to postpone the logout (to finish work on the objects in the workspace) or to continue the logout process and discard all changes to the objects in the workspace.
Adding Ticket Relations via Drag-and-Drop
You can add ticket relations to a ticket by dragging-and-dropping the ticket icon into the Section for Related Tickets of the ticket. You can use a ticket icon from the ticket list (see figure below), from the Workspace, or from the Favorites for this purpose. Once you have dropped the ticket icon, the Section for Related Tickets is opened in edit mode. The target ticket is already selected and you can directly select the type of relation. Please see Adding a Ticket Relation for further information.

Figure 166: Adding a ticket relation using drag-and-drop
Opening the Main Customer of a Ticket
There are two ways to quickly open the main customer of a ticket:
- (1) Click the customer link in the ticket list.
- (2) Click the Jump to contact / company link in the Customers Section of the ticket.

Figure 167: Opening the main customer of a ticket
If the customer is a contact within a two-level customer model, you can also jump directly to the company which the contact belongs to. To do so, please proceed as follows:
- Select the visibility level Detail.
- Click the Jump to company link in the context menu of the company.

Figure 168: Opening the company
If you want to open the page of an additional customer, you can use the Jump to contact / company links in the context menu of the additional customer.