
This chapter will guide you through the complete set-up of a resource model. You will learn how to
In our example, you are an administrator who has to set up a resource model for a company which wants to manage their IT assets, as well as their products, using the Resource Pool.
The complete model will look like the one in the following figure. We will show you how to define the Printers and the Office software to demonstrate the basic principles. Then you should be able to configure all remaining resources yourself.
Figure 448: ConSol CM Admin Tool - Example of a resource model
A Resource Group represents the objects at the highest hierarchical level in the data model of the Resource Pool. In our example, all printers are managed in a Resource Group Printers and all office software packages are managed in a Resource Group called OfficeSoftware. The following figure shows some Resource Groups and Resource Types in the Web Client. This should provide you with an overview of the configuration in the Admin Tool and its consequences in the Web Client. Please keep in mind that the technical object names which are used in the Admin Tool are usually not the (localized) names which are displayed in the Web Client.

Figure 449: ConSol CM Web Client - Resources in the Resource Pool Dashboard
The first step in a new (empty) resource model is to create a new Resource Group which contains one Resource Type. The Resource Type contains one Resource Field Group.
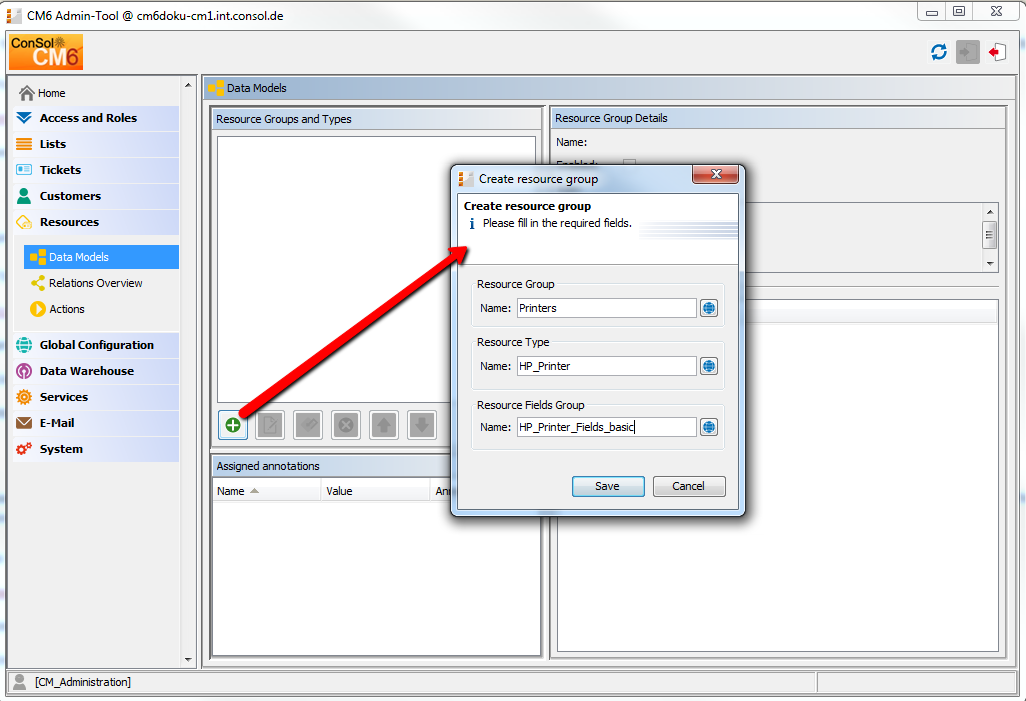
Figure 450: ConSol CM Admin Tool - Creating a new resource group
To create a Resource Group, fill out the following fields:
Click Save to create the Resource Group, Type and first Field Group.
Once you have defined the Resource Group, you can add some more data for the created objects.

Figure 451: ConSol CM Admin Tool - Editing a Resource Group
Mark the Resource Group and click the Edit button to edit some Resource Group parameters:
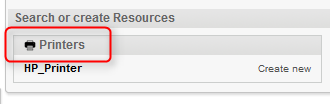
Figure 452: ConSol CM Web Client - Customized icon for a Resource Group
Click Save to commit your changes.

Figure 453: ConSol CM Admin Tool - Editing a Resource Type
Mark the Resource Type and click the Edit button to edit the following Resource Type parameters:
The Resource Relations are also defined for a Resource Type. This is described in detail in the section CM.Resource Pool - Resource Relations.
The mode of a resource type defines whether the resource data is stored in the ConSol CM system and - if required - how the transfer from the external system to ConSol CM is managed. Once the mode has been set and resources of the respective type are present in the system, the mode cannot be changed!
In ConSol CM, you have to distinguish between internal resources and external resources. The latter comprise On the fly Resources, Cached Resources and Imported Resources, i.e., all resources which are not completely stored in and managed by ConSol CM.
Only internal resources can be created using the Web Client. External resources can be neither created nor modified (permanently) nor deleted using the Web Client. For all external resources the complete data model has to be defined in the Admin Tool before the first data transfer can be performed. The use of On the fly Resources and Cached Resources is based on the implementation of a specific interface. Therefore, those resources can only be used with a customer-specific ConSol CM .ear file. The respective development project has to be built and deployed before the first data transfer takes place. The following sections provide a detailed overview of all four resource types.

Figure 454: Resource modes

Figure 455: ConSol CM Admin Tool - Configuration of Resource Type mode
This mode is available in all ConSol CM versions with a Resource Pool, i.e., starting with CM version 6.10.1.
The resource data is fully managed by ConSol CM. Engineers who have sufficient access permissions can use the Web Client to create, modify or delete resources.
This mode is available in ConSol CM versions 6.10.3.0 and higher. In previous versions this mode is not available.
The resource data is retrieved from an external backend system whenever requested. The mode on-the-fly relies on a customer-specific implementation of the Java interface ResourceExternalSource.
An on-the-fly resource does not have any data which is stored in ConSol CM except for an external ID. This ID is used to retrieve data from the external system upon request.
This mode is available in ConSol CM versions 6.10.3.0 and higher. In previous versions this mode cannot be selected.
The resource data originates from an external backend system. The data is transferred into ConSol CM upon the first request and is then cached in the ConSol CM database. The first request to the external system is executed when the resource is linked to another object (a ticket, a customer or another resource), i.e., when a relation is established. The mode Cached relies on a customer specific implementation of the Java interface ResourceExternalSource.
In the Web Client:
This mode is available in ConSol CM versions 6.10.3.0 and higher. In previous versions, the mode cannot be selected.
The resource data originates from an external backend system and is stored in the ConSol CM database. Once the data has been imported into ConSol CM, it is treated almost like internal data. The import into ConSol CM usually relies on an ETL (Extract - Transform - Load) job which is run once or on a certain schedule.
In the Web Client:
In order to integrate external resources into your CM system, you have to write a special Java / Groovy class which implements the interface ResourceExternalSource with the three methods
A detailed example for a mock class is provided in the ConSol CM Release Notes for version 6.10.3. You will have to implement the methods for your system to provide real data from your IT infrastructure.
A Resource Field Group is a collection of Resource Fields, the data fields for resource data (analog to a Custom Field Group which is a collection of Custom Fields for ticket data). Resource Fields can never be managed as singular objects, they are always managed (e.g., faded in or out) as a Resource Field Group.
A Resource Field Group has the following group-specific parameters. Mark the desired Resource Field Group and click Edit to edit those values (see the next section).

Figure 456: ConSol CM Admin Tool - Editing Resource Field Group-specific parameters
Here, you can edit the following fields:
A Resource Field Group can have annotations. Select the Resource Field Group and press the Annotations button to set or unset annotations. The annotations are the same as for Custom Field groups. All annotations are listed and explained in Annotations.

Figure 457: ConSol CM Admin Tool - Resource Field Group annotations
Resource Fields are containers for the data of resources (analog to Custom Fields for ticket data). Resource Fields always belong to a Resource Field Group. To add or edit Resource Fields of a Resource Field Group, select the group in the resource data model and enter all required data on the right-hand side of the Admin Tool.

Figure 458: ConSol CM Admin Tool - Managing Resource Fields
To create a new Resource Field, click the Add button and enter the required data in the pop-up window.

Figure 459: ConSol CM Admin Tool - Creating a new Resource Field
Enter the following data:
The following data types are available for Custom Fields, Data Object Group Fields and Resource Fields.
If you work with scripts, either in CM workflows or in the Admin Tool, please note that the behavior of boolean fields which are represented as checkboxes, i.e. with annotation boolean-type = checkbox (default) is different depending on the CM version!
Fields which have already been filled with values in the database will not be changed during an update from a version prior to 6.9.4.0 to a version 6.9.4.0 and up.
Boolean fields represented as radio buttons (annotation boolean-type = radio) or drop-down menu (annotation boolean-type = select) are always shown and behave as described for versions 6.9.4.0 and up, i.e., with NULL value if untouched.
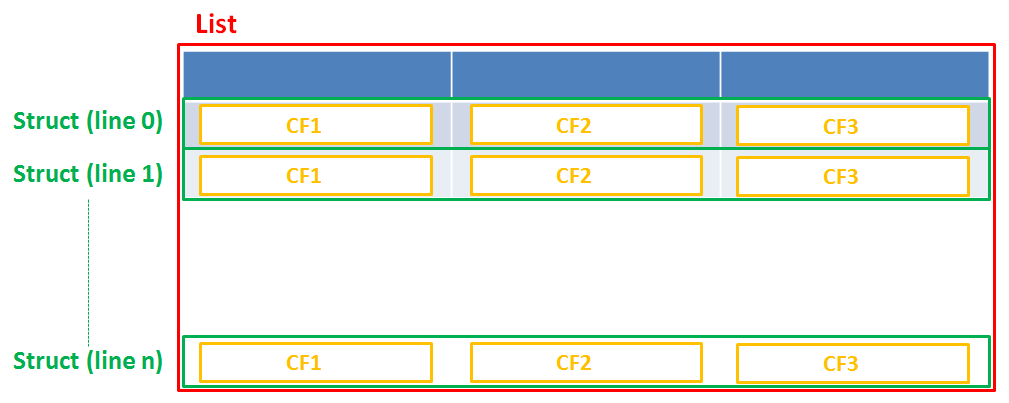
Figure 460: Scheme: List of Structs
Technically spoken, the list is an array which contains a map (= key:value pairs) in each field.
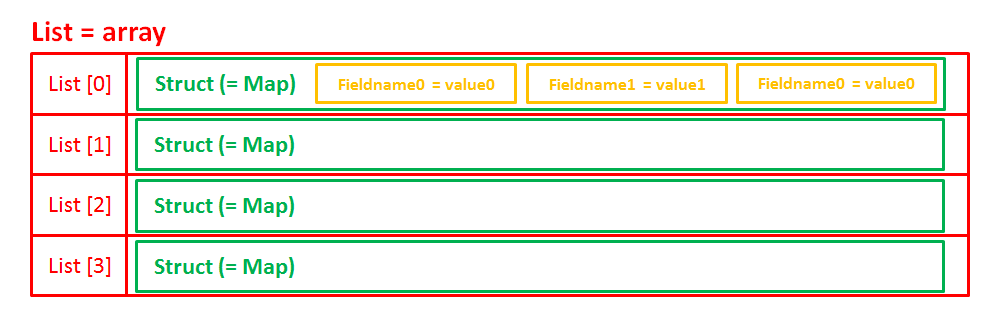
Figure 461: List of structs, tecnical principle
Restriction when using an Oracle database: at most 4000 bytes can be saved in UTF encoding. Starting with Oracle12c.
For long strings the limit depends on the database system used for ConSol CM: MS SQL Server: 2 GByte; MySQL: 4 GByte; Oracle: 16 - 64 GByte (depending on page size of tablespace).
For string fields, you can use specific annotations to fine-tune the field definition. For example, a string field can be defined to contain a URL which will automatically be displayed as hyperlink. Please read the following section.
The data type you choose on creating a data field cannot be changed afterwards!
String fields are widely used for customer, ticket, and resource data and strings can be used to contain various content, for example, a text box with a comment, a simple input field with only 20 characters, a URL or a password. The fine-tuning of string fields is implemented using specific annotations which are all listed on the Annotations page. However, since work with these annotations is an every-day task of CM administrators, the most important and most commonly used annotations will be explained here as well.
Value for annotation text-type: textarea
The size of the text box can be adjusted, displayed as standard text box depending on web browser. Use the field-size annotation in case a specific size of the text box is required.
Value for annotation text-type: password
Only dots will be displayed. This annotation does not define the field to contain a password! It only defines the display mode! Use the password annotation to define a string field to contain the CM.Track password.
Value for annotation text-type: url
Input will be displayed as a hyperlink in view mode. String has to match a specific URL pattern:
First part of the string is the link (url), second part is the name which should be displayed.
Example: "http://consol.de ConSol"
Value for annotation text-type: file-url
Input will be displayed as a link to a file on the file system. The web browser has to allow/support those links!
Example: Enabling file:// URLs in a Firefox browser
Add the following lines to either the configuration file prefs.js or to user.js in the user profile. On a Windows system usually in a folder like C:\Users\<USERNAME>\AppData\Roaming\Mozilla\Firefox\Profiles\uvubg4fj.default
Alternatively a Firefox browser add-on like Local Filesystem Links can be installed for better access to the referenced files and folders.
The link will also be displayed as tooltip.
The URL is correctly formed if the following conditions are met:
Example URLs:
Value for annotation text-type: label
This will be a read-only field which is displayed in gray, use the label-group annotation to link label and input fields which belong together.
Value for annotation username: true
Will be used for authentication against CM.Track server. Only for Data Object Group Fields in a contact object.
Value for annotation password: true
Will be used for authentication against CM.Track server (in DATABASE mode). Only for Data Object Group Fields in a contact object.
Value for annotation email: true
The field may only contain valid e-mail addresses. Input will be validated according to standard e-mail format <name>@<domain>.
The characteristics of a Resource Field, e.g., the visibility, the position in the Web Client, and whether the field should be indexed or reportable, are defined using annotations. You might know this principle from your work with Custom Field annotations.

Figure 462: ConSol CM Admin Tool - Defining Resource Field annotations
The annotations which are available are the same as for Custom Fields and are listed and explained in detail in Annotations.
The position annotation marks the position of the field on
As with ticket layout, you can place the Resource Fields in the GUI by using the matrix principle and setting the position accordingly:

Figure 463: Example matrix for position annotation
To add a new Resource Type within a Resource Group, mark another Resource Type of the desired Resource Group in the list and click the Add button. Then fill in all required data as described in the section Editing the Resource Type.
To create a new Resource Field Group within a Resource Type, select another Resource Field Group of the desired Resource Type in the list and click the Add button. Then enter all the required data as described in the section Editing the Resource Field Group.
To create a new Resource Group (OfficeSoftware in our example), select another Resource Group in the list and click the Add button.
Enter all the data as for the first Resource Group, see section Editing the Resource Group.

Figure 464: ConSol CM Admin Tool - Adding a new Resource Group
To fill the new Resource Group with Resource Types and Resource Fields, proceed as described in the previous sections.
In our example, the following resource model has been created. It will be used as a basis for later examples in this manual.

Figure 465: ConSol CM Admin Tool - Example for a resource model

Figure 466: ConSol CM Web Client - Example for a resource model (in Resource Pool Dashboard)
This is explained in detail in the section CM.Resource Pool - Resource Relations.
This is explained in detail in the section CM.Resource Pool - Resource Actions.
This is explained in detail in the section CM.Resource Pool - Assigning Permissions for Resources.