CM/Resource Pool - Setting Up the Basic Resource Model
Introduction
This chapter will guide you through the complete set-up of a resource model. You will learn how to
- create a resource category
- create two resource types within this resource category
- create data fields for the resources, i.e., create resource field groups for the resource types
- create resource fields within the resource field groups. i.e., create the data fields
- define templates for the display format of the resource names in the Web Client
In our example, you are an administrator who has to set up a resource model for a company which wants to manage their IT assets, as well as their products, using the Resource Pool.
The complete model will look like the one in the following figure. We will show you how to define the Printers and the Office software to demonstrate the basic principles. Then you should be able to configure all remaining resources yourself.

Figure 468: ConSol CM Admin Tool - Resources, Data Models: Example of a resource model
The above figure shows a resource pool data model with the following elements:
- Resources for IT management (1)
- Resources for product management (2)
The following example covers printers and office software (3).
Creating a Resource Category with the First Resource Type
A resource category represents the objects at the highest hierarchical level in the data model of the Resource Pool. In our example, all printers are managed in a resource category Printers and all office software packages are managed in a resource category called OfficeSoftware. The following figure shows some resource categories and resource types in the Web Client. This should provide you with an overview of the configuration in the Admin Tool and its consequences in the Web Client. Please keep in mind that the technical object names which are used in the Admin Tool are usually not the (localized) names which are displayed in the Web Client.

Figure 469: ConSol CM Web Client - Resources in the Resource Pool Dashboard
- Resource categories (1)
- Resource types (2)
The first step in a new (empty) resource model is to create a new resource category which contains one resource type. The resource type contains one resource field group.

Figure 470: ConSol CM Admin Tool - Resources, Data Models: Creating a new resource category
To create a resource category, fill out the following fields. The localization for the names of resource category, resource type and resource field group is done using the fields on the main Data Models tab and is explained in section Localization of Data Fields. The descriptions are localized using the Localize button which is explained in section Localization of Objects in General, Type 1.
- Resource category, Name
The technical name of the resource category. - Resource type, Name
The technical name of the first resource type within the resource category.
More resource types for the resource category can be added later on. - Resource field group, Name
The name of the first resource field group (similar to a ticket field group for ticket data) within the resource type. In case the resource field group is displayed in the Group section of the resource page (annotation show-in-group-section = true), the localized name will be displayed as header of the respective tab.
More resource field groups for the same resource type can be added later.
Click Save to create the resource category, type and first field group.
Once you have defined the resource category, you can add some more data for the created objects.
Editing the Resource Category

Figure 471: ConSol CM Admin Tool - Resources, Data Models: Editing a resource category
Mark the resource category and click the Edit button to edit some resource category parameters:
- Description
You can enter the description directly in the pop-up window, which will become the default description, or you can use the Localize button to enter localized values for each language. The resource category description is displayed only in the Admin Tool, not in the Web Client. - Icon
Select one of the ConSol CM standard icons by clicking the icon, or use the file browser to upload an icon of your choice. The resource category icon will be displayed in the Web Client next to the name of the resource category. In this way, you can, for example, select a Printer icon for printers, a PC icon for PCs, etc. Allowed image file formats are: jpg, png, gif. We recommend to use 32 x 32 px as image size to achieve a reasonable size of the icon on the resource type page. In tables and at other locations on the GUI where the resource is displayed, the icon is re-sized automatically.

Figure 472: ConSol CM Web Client - Customized icon for a resource category
Click Save to commit your changes.
Editing the Resource Type

Figure 473: ConSol CM Admin Tool - Resources, Data Models: Editing a resource type
Mark the resource type and click the Edit button to edit the following resource type parameters:
- Description
You can enter the description directly in the pop-up window, this will become the default description. Or you can use the Localize button to enter localized values for each language. The resource type description is displayed as information in the Admin Tool only, not in the Web Client. - Mode (for a detailed explanation of all modes, refer to section Information about Resource Modes)
- Internal
Resource data is fully managed by ConSol CM. For details see section Internal Resources. - On the fly
Resource data are retrieved from an external backend system whenever requested (available in ConSol CM version 6.10.3.0 and higher). For details see section On the fly Resources. - Cached
Resource data come from an external backend system and are cached in ConSol CM. A refresh of an item can be triggered manually (available in ConSol CM version 6.10.3.0 and higher). For details see section Cached Resources. - Imported
Resource data come from an external backend system and are stored in ConSol CM. An update requires a new bulk data import (available in ConSol CM version 6.10.3.0 and higher). For details see section Imported Resources.
- Internal
- Icon
Select one of the ConSol CM standard icons by clicking the icon, or use the file browser to upload an icon of your choice. The resource type icon will be displayed in the Web Client next to the name of the resource type, e.g., on the resource type page. In this way, you can, for example, select a Printer icon for printers, a PC icon for PCs etc. Allowed formats are: jpg, png, gif. We recommend to use 32 x 32 px as image size to achieve a reasonable size of the icon on the resource page. In tables and at other locations on the GUI where the resource is displayed, the icon is re-sized automatically. - Templates
Here you can define the templates for the display format of resource data in the Web Client (analog to templates for customer data). This is explained in detail in section CM/Resource Pool - Templates for Resource Data. - Automatic Actions
Here you can assign automatic resource actions to the resource type. The resource actions have to be defined first, using the resource actions section of the Admin Tool. See section CM/Resource Pool - Resource Actions for a detailed explanation. - Manual Actions
Here you can assign manual resource actions to the resource type. The resource actions have to be defined first, using the resource actions section of the Admin Tool. See section CM/Resource Pool - Resource Actions for a detailed explanation. - Search Actions
Here you can assign search actions to the resource type. The resource search actions have to be defined first using the Scripts and Templates section of the Admin Tool. See section Action Framework - Search Actions for a detailed explanation.
The resource relations are also defined for a resource type. This is described in detail in the section CM/Resource Pool - Resource Relations.
Information about Resource Modes
The mode of a resource type defines whether the resource data is stored in the ConSol CM system and - if required - how the transfer from the external system to ConSol CM is managed. Once the mode has been set and resources of the respective type are present in the system, the mode cannot be changed!
In ConSol CM, you have to distinguish between internal resources and external resources. The latter comprise On the fly Resources, Cached Resources and Imported Resources, i.e., all resources which are not completely stored in and managed by ConSol CM.
Only internal resources can be created using the Web Client. External resources can be neither created nor modified (permanently) nor deleted using the Web Client. For all external resources the complete data model has to be defined in the Admin Tool before the first data transfer can be performed. The use of On the fly Resources and Cached Resources is based on the implementation of a specific interface. Therefore, those resources can only be used with a customer-specific ConSol CM .ear file. The respective development project has to be built and deployed before the first data transfer takes place. The following sections provide a detailed overview of all four resource types.

Figure 474: Resource modes

Figure 475: ConSol CM Admin Tool - Resources, Data Models: Configuration of resource type mode
- (1) Internal
- (2) External
Internal Resources
The resource data is fully managed by ConSol CM. Engineers who have sufficient access permissions can use the Web Client to create, modify or delete resources.
On the fly Resources
The resource data is retrieved from an external backend system whenever requested. The mode on-the-fly relies on a customer-specific implementation of the Java interface ResourceExternalSource.
An on-the-fly resource does not have any data which is stored in ConSol CM except for an external ID. This ID is used to retrieve data from the external system upon request.
In the Web Client:
- The Detailed Search is not available.
- In order to search CM for an on-the-fly resource, only the external ID can be used.
- There is no resource page.
- There is no resource type page
- The resource is only available/visible in the relations section of
- tickets
- customers
- other resources.
- The resource data cannot be edited.
Cached Resources
The resource data originates from an external backend system. The data is transferred into ConSol CM upon the first request and is then cached in the ConSol CM database. The first request to the external system is executed when the resource is linked to another object (a ticket, a customer or another resource), i.e., when a relation is established. The mode Cached relies on a customer specific implementation of the Java interface ResourceExternalSource.
In the Web Client:
- The Detailed Search is only available for resources that have been requested at least once and are thus present in ConSol CM with their full data set.
- For resources which are already present in ConSol CM (i.e., are cached)
- a resource page is available.
- a resource type page is available.
- a refresh of the resource data can be triggered manually on the Resource Page.
- In order to search ConSol CM for a cached resource which has not yet been requested, only the external ID can be used.
- There are no Resource Pages for resources which have not yet been cached.
- The resource is only available in the Relations section of tickets, customers or other resources. The resource fields are only displayed in the Relations section as well.
- The resource data cannot be edited.
Imported Resources
The resource data originates from an external backend system and is stored in the ConSol CM database. Once the data has been imported into ConSol CM, it is treated almost like internal data. The import into ConSol CM usually relies on an ETL (Extract - Transform - Load) job which is run once or on a certain schedule.
In the Web Client:
- The Detailed Search is fully available for imported resources.
- A resource page is available.
- A resource type page is available.
- Imported resource cannot be created using the Web Client (only via import).
- The resource data can be edited, but a new import might overwrite changes.
In order to integrate external resources into your CM system, you have to write a special Java / Groovy class which implements the interface ResourceExternalSource with the three methods
- PageResult<Resource> searchByPattern(ResourceType pType, String pPattern, int pPageSize, int pPageNumber)
- Resource importResource(Resource pResource)
- Resource getByExternalId(ResourceType pType, String pExternalId)
A detailed example for a mock class is provided in the ConSol CM Release Notes for version 6.10.3. You will have to implement the methods for your system to provide real data from your IT infrastructure.
Editing the Resource Field Group
A resource field group is a collection of resource fields, the data fields for resource data (analog to a ticket field group which is a collection of ticket fields for ticket data). Resource fields can never be managed as singular objects, they are always managed (e.g., faded in or out) as a resource field group.
A resource field group has the following group-specific parameters. Mark the desired resource field group and click Edit to edit those values (see the next section).
Editing Resource Field Group-Specific Parameters

Figure 476: ConSol CM Admin Tool - Resources, Data Models: Editing resource field group-specific parameters
Here, you can edit the following fields:
- Name
The technical name of the resource field group. This should only be changed if truly required, as changing it might have side effects on all scripts (workflow and Admin Tool) which use the resource category name. To change the term of the resource field group which is displayed in the GUI, use the mechanism which is explained in section Localization of Data Fields. - Dependent Enum Scripts
Here you can assign a Dependent Enum to the resource field group. The Dependent Enum has to be defined as an Admin Tool script first, as described in section Scripts of Type Dependent Enum.
Setting Resource Field Group Annotations
A resource field group can have annotations. Select the resource field group and click the Annotations button to set or unset annotations. The annotations are the same as for ticket field groups. All annotations are listed and explained in Annotations.

Figure 477: ConSol CM Admin Tool - Resources, Data Models: Resource field group annotations
Creating and Editing Resource Fields
Resource fields are containers for the data of resources (analog to ticket fields for ticket data). Resource fields always belong to a resource field group. To add or edit resource fields of a resource field group, select the group in the resource data model and enter all required data on the right-hand side of the Admin Tool.

Figure 478: ConSol CM Admin Tool - Resources, Data Models: Managing resource fields
Creating a New Resource Field
To create a new resource field, click the Add button and enter the required data in the pop-up window.

Figure 479: ConSol CM Admin Tool - Resources, Data Models: Creating a new resource field
Enter the following data:
- Name
The technical name of the resource field. This is used in scripts and templates. The localization mechanism is explained in section Localization of Data Fields. - Data type
The data type of the resource field. You can select a data type from a drop-down list, like for ticket fields or customer fields. The following section provides detailed information about the available data types. - Description
Enter the description for the resource field. If provided, the description will be used as a tooltip in the Web Client. You can enter a localized description using the globe icon. For details, please refer to section Localization of Objects in General, Type 1.
Types of Data Fields
The following data types are available for ticket fields, customer fields and resource fields.
- autocomplete
A data field which contains a text autocomplete field. This is a dynamic list which is based on a script of type Text Autocomplete. A detailed explanation of text autocomplete fields is given - boolean
Values: true/false. Depending on the annotation boolean-type, the value is displayed as checkbox, radio buttons, or drop-down list.If a boolean field has not been touched, its value is NULL. If it is checked, its value is true, and if it is unchecked again, its value is false.
- date
Format and accuracy can be set by annotations. - enum
For sorted lists. The engineer can choose one of the enum values in the Web Client. Enums and values have to be created previously within the Managing Sorted Lists: Enums. Select the desired Enum type and Enum group in the fields below. - list
A data field of this data type is the first step to creating a list (one column) or a table (multiple columns) of input fields in the Web Client.- For a table the next step will be to create another field of type struct (see below) to contain the input of the individual list fields (which will become the columns of the table). So, if you want to create a table you have to define a field of the type struct first (see below) before you can add the fields for the table columns.
- For a simple list, the next step will be to create fields which belong to the list. No struct is required.
- struct
A data field of this type defines a data structure (line of a table) which groups one or multiple fields. It is the second step to building a table after you have created a field of the type list. Add the fields for the columns of the table in the next step. The dependencies have to be set for each field in the Belongs to field (see below), i.e., a struct always belongs to a list.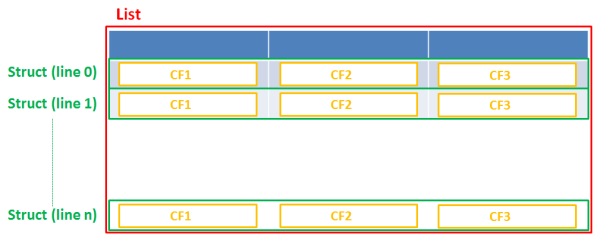
Figure 480: Scheme: List of structs
Technically spoken, the list is an array which contains a map (= key:value pairs) in each field.
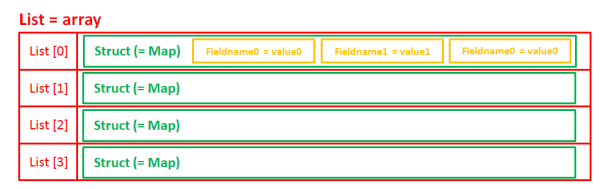
Figure 481: List of structs, technical principle
- number
For integer values. - fixed point number
For numbers with a fractional part, e.g., currencies. You have to enter the total number of digits (Precision) and the number of digits that fall to the right of the decimal point (Scale) in the respective fields below. - string
For up to 4000 alphanumeric characters.Restriction when using an Oracle database: at most 4000 bytes can be saved in UTF encoding. Starting with Oracle12c.
- long string
For large objects.For long strings the limit depends on the database system used for ConSol CM: MS SQL Server: 2 GByte; MySQL: 4 GByte; Oracle: 16 - 64 GByte (depending on page size of tablespace).
- short string
For up to 255 alphanumeric characters.For string fields, you can use specific annotations to fine-tune the field definition. For example, a string field can be defined to contain a URL which will automatically be displayed as hyperlink or can be the hook for an autocomplete list. Please read the following section.
- contact data reference
Special data type used internally for referencing the contacts associated with a ticket. This data type is not displayed but only used internally in the CM system. - MLA field
This data type is used for fields that contain hierarchical lists with a tree structure called MLA (Multi Level Attributes). The name of the field is the name of the new MLA that has to be defined within the MLAs. The group of the field has to be referenced when the MLA is created.


The data type you choose on creating a data field cannot be changed afterwards!
Using Annotations to Fine-Tune Data Fields
String fields are widely used for customer, ticket, and resource data and strings can be used to contain various content, for example, a text box with a comment, a simple input field with only 20 characters, a URL or a password. The fine-tuning of string fields is implemented using specific annotations which are all listed on the Annotations page. However, since work with these annotations is an every-day task of CM administrators, the most important and most commonly used annotations will be explained here as well.
How can I ...
... insert a text box instead of a single line?
Value for annotation text-type: textarea
The size of the text box can be adjusted, displayed as standard text box depending on web browser. Use the field-size annotation in case a specific size of the text box is required.
... hide the input of the fields for passwords?
Value for annotation text-type: password
Only dots will be displayed. This annotation does not define the field to contain a password! It only defines the display mode! Use the password annotation to define a string field to contain the CM/Track password.
... display a hyperlink, display the name instead of the link?
Value for annotation text-type: url
Input will be displayed as a hyperlink in view mode. String has to match a specific URL pattern:
- "^((?:mailto\:|(?:(?:ht|f)tps?)\://)1\S+)(?: (?:\| )?(.*))?$"
First part of the string is the link (url), second part is the name which should be displayed.
Example: "http://consol.de ConSol"
... display a file link?
Value for annotation text-type: file-url
Input will be displayed as a link to a file on the file system. The web browser has to allow/support those links!
Example: Enabling file:// URLs in a Firefox browser
Add the following lines to either the configuration file prefs.js or to user.js in the user profile. On a Windows system usually in a folder like C:\Users\<USERNAME>\AppData\Roaming\Mozilla\Firefox\Profiles\uvubg4fj.default
- user_pref("capability.policy.localfilelinks.checkloaduri.enabled", "allAccess");
- user_pref("capability.policy.localfilelinks.sites", "http://cm-server.domain.com:8080");
- user_pref("capability.policy.policynames", "localfilelinks");
Alternatively a Firefox browser add-on like Local Filesystem Links can be installed for better access to the referenced files and folders.
The link will also be displayed as tooltip.
The URL is correctly formed if the following conditions are met:
- It starts with file: followed by regular slashes:
- three slashes "///" for files on the same computer as the browser (alternatively "//localhost/") or
- two slashes followed by the server name followed by another slash for files on file servers accessible from the computer running the browser.
- These are followed by the full path to the file ending with the file name.
- The path on Microsoft Windows systems is also written with forward slashes instead of backslashes.
- The drive letter of a local path on Microsoft Windows systems is noted as usual, for example C:.
- Paths with spaces and special characters like "{, }, ^, #, ?" need to be percent encoded ("%20" for a space for example) for Microsoft Windows systems.
Example URLs:
- file://file-server/path/to/my/file.ext
- file:///linux/local/file.pdf
- file:///C:/Users/myuser/localfile.doc
See also the explanation about file-url in the section text-type
... define a label?
Value for annotation text-type: label
This will be a read-only field which is displayed in gray, use the label-group annotation to link label and input fields which belong together. Please take a look at the annotations for labels (show-label-in-edit, show-label-in-view) before implementing special label fields!
... define a field for the valid email addresses?
Value for annotation email: true
The field may only contain valid email addresses. Input will be validated according to standard email format <name>@<domain>.
... define a scripted autocomplete list?
Value for the annotation text-type = autocomplete
Optional: value for the annotation autocomplete-script = <name of the respective script>
A scripted autocomplete list is used to provide a drop-down menu which is filled dynamically using the input the engineer has provided so far. For example, when the user types "Mil", the possible values "Miller", "Milberg", and "Milhouse" are displayed as list and the engineer can select the one required for the field. You know this behavior from other autocomplete fields, e.g., the search for engineers for a ticket or the search for customers while creating a ticket. However, in these cases, CM generates the list automatically. The behavior cannot be influenced or customized. Scripted autocomplete lists, on the contrary, can be implemented by the CM administrator. The values are based on a result set which is dynamically created. The result set can contain strings, engineers, customers (Units), and resources.
A detailed description of scripted autocomplete lists is provided in section Scripts of Type Text Autocomplete.
... define a rich text field?
Create a field of the type long string.
Value for the annotation string-content-type: html-inline (field content is directly displayed on the GUI in view mode) or html-link (field content is displayed in a pop-up window after clicking the Show content link in view mode)
A rich text field can contain images and formatted text. In the edit mode, it features a basic editor.
... define a tooltip for a data field?
Value of the annotation show-tooltip = true
When creating or editing a data field, you can enter a text in the Description field. This text is used as a tooltip in the Web Client. You can enter a localized description using the globe icon.
This does not apply to date fields and fields containing phone numbers and URLs, as they have special tooltips.
... optimize the data field layout?
Use three columns to display the data fields.
Display data fields which most likely have a value on the left in order to avoid gaps.
Add the annotations position = 0;0 and colspan = 3 to all tables. Remove the colspan annotations from other types of data fields.
Show the labels for all data fields (annotation show-label-in-view should be true).
Setting Resource Field Annotations
The characteristics of a resource field, e.g., the visibility, the position in the Web Client, and whether the field should be indexed or reportable, are defined using annotations. You might know this principle from your work with ticket field annotations.

Figure 482: ConSol CM Admin Tool - Resources, Data Models: Defining resource field annotations
The annotations which are available are the same as for ticket fields and are listed and explained in detail in Annotations.
The position annotation marks the position of the field on
- the form which is used to create a new resource. See section A Short Introduction to CM/Resource Pool Functionalities in the Web Client, Resource Create Form.
- the resource page which is explained in section A Short Introduction to CM/Resource Pool Functionalities in the Web Client, Resource Page.
As with ticket layout, you can place the resource fields in the GUI by using the matrix principle and setting the position accordingly:

Figure 483: Example matrix for position annotation
Copying Resource Fields
You do not necessarily have to create every data field using the pop-up menu. You can also copy an existing data field. This might be a ticket field, customer field, or resource field. Select the respective data field in the data field group and click the Copy button. Then navigate to the data field group where the copied field should be placed. This might be a ticket field group, a customer field group, or a resource field group. You can copy a field from one object type (e.g. ticket) to another (e.g. customer). Click into the list of data fields of the target field group and click the Paste button.
Every type of field can be copied, from simple string fields over enums to entire lists of structs. To copy a list of structs or a list of fields, mark and copy only the list, the child objects (e.g., structs with fields) will be copied automatically.
These things will be copied:
- almost all annotations with their values
- all localized values
These things will not be copied:
- the following annotations
- ldapid: This annotation can be only once in a data model. Duplication would cause an invalid model.
- username: This annotation can be only once in a data model. Duplication would cause an invalid model.
- password: This annotation can be only once in a data model. Duplication would cause an invalid model.
- position: The value for this annotation must be unique, so the annotation is duplicated, but the value is removed from the copy.
- ticket-list-position: This annotation should be used very specifically and, thus, it should be present only for very few fields. Duplicating it would potentially multiply it although it should not be used for the majority of copies.
Naming of the copied field(s):
- Copy to other field group: field name is used
- Copy to same field group: <field name>_copy is used
Besides the Copy/Paste buttons you can also use the keyboard shortcuts:
- Copy: CTRL-C
- Paste: CTRL-V
Using Scripted Field Visualization for Resource Fields
Using scripted field visualization, you can enhance the display of data in resource fields. Please see section Scripts of Type Field Visualization for details.
Creating Further Resource Types within a Resource Category
To add a new resource type within a resource category, mark another resource type of the desired resource category in the list and click the Add button. Then fill in all required data as described in the section Editing the Resource Type.
Creating Resource Field Groups and Resource Fields
To create a new resource field group within a resource type, select another resource field group of the desired resource type in the list and click the Add button. Then enter all the required data as described in the section Editing the Resource Field Group.
Creating Further Resource Categories
To create a new resource category (OfficeSoftware in our example), select another resource category in the list and click the Add button.
Enter all the data as for the first resource category, see section Editing the Resource Category.

Figure 484: ConSol CM Admin Tool - Resources, Data Models: Adding a new resource category
To fill the new resource category with resource types and resource fields, proceed as described in the previous sections.
Example for a Complete Resource Model
In our example, the following resource model has been created. It will be used as a basis for later examples in this manual.

Figure 485: ConSol CM Admin Tool - Resources, Data Models: Example for a resource model

Figure 486: ConSol CM Web Client - Example for a resource model (in Resource Pool Dashboard)
Defining Resource Relations
This is explained in detail in the section CM/Resource Pool - Resource Relations.
Defining Resource Actions
This is explained in detail in the section CM/Resource Pool - Resource Actions.
Assigning Access Permissions for Resources to Engineers Using Roles
This is explained in detail in the section CM/Resource Pool - Assigning Permissions for Resources.