Creating a New Customer
If you have the required permissions, you can create a new customer in several places:
- In the main menu, see Creating a New Customer Using the Main Menu.
- In a ticket, see Creating a New Customer in a Ticket.
- On the company page, see Creating a New Contact on the Company Page.
In addition to these standard locations, it might be possible to create customers using activities, e.g., on a resource or customer page. This depends entirely on the individual configuration of your CM system.
Creating a New Customer Using the Main Menu
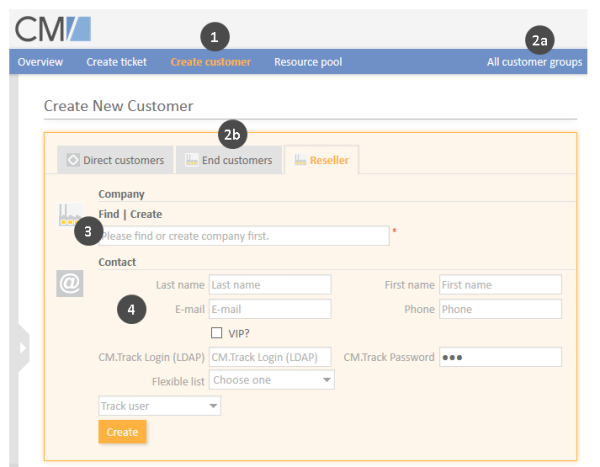
Figure 88: Creating a customer using the main menu (two-level customer model)
Please proceed as follows to create a new customer using the main menu:
- Click Create customer in the main menu.
- Select the customer group:
- Limit the customer group globally throughout the system by selecting the desired customer group in the customer groups filter.
- Click the tab of the desired customer group.
- Provide the company (only two-level customer models):
- Find an existing company by entering the company name. The Autocomplete Search will display matching companies as soon as you start typing the company name, see Autocomplete Search.
- Click the Create link to start creating a new company. Fill out the data fields and click Create.
- Create the new contact by filling out data fields and clicking Create. The contact will be linked automatically to the company you selected or created above.
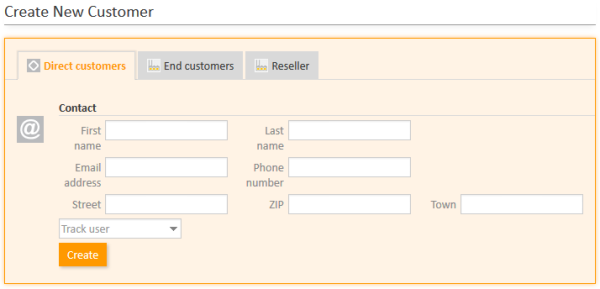
If you work with a customer group with a one-level customer model, you skip step 3 as you only see one section, which corresponds either to the contact or company.
Figure 89: Creating a customer in a one-level customer model
Creating a New Customer in a Ticket
You can create a new customer within a ticket. In this case you can only create customers in customer groups which are assigned to the current queue of the ticket. Therefore the available customer groups depend on the ticket's queue and on your selection in the customer groups filter. Please proceed as follows to create a new customer within a ticket:
-
Remove the existing ticket customer by clicking the Change link in the customer's context menu (only existing tickets, see Changing the Main Customer of an Existing Ticket.
If you are creating a new ticket, the Customers Section of the ticket is empty and you can directly start the creation of a new customer.
- Select the customer group:
- Limit the customer group globally throughout the system by selecting the desired customer group in the customer groups filter.
- Click the tab of the desired customer group.
- Provide the company (only two-level customer models):
- Find an existing company by entering the company name. The Autocomplete Search will display matching companies as soon as you start typing the company name, see Autocomplete Search.
- Click the Create link to start creating a new company. Fill out the data fields and click Create.
- Create the new contact by filling out data fields and clicking Create and select. The contact will be linked automatically to the company you selected or created above.
If you work with a customer group with a one-level customer model, you skip step 3 as you only see one section, which corresponds either to the contact or the company.
Creating a New Contact on the Company Page
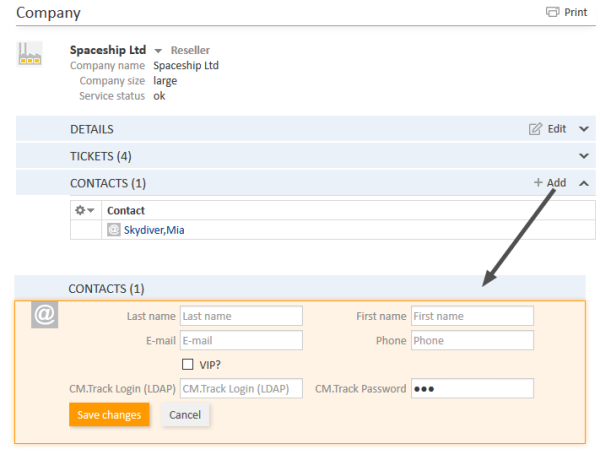
In a two-level customer model you can create a new contact for an existing company on the company page. Please proceed as follows:
- Open the company page.
- Click the Add link in the Contacts Section.
- Fill out the data fields and click Save changes. The new contact will be linked automatically to the company.
Figure 90: Creating a contact on the customer page
How to Fill In the Data Fields During Customer Creation
Please see The Different Data Fields to learn how to fill in the standard data fields.
Some of the fields might activate the Autocomplete Search to check if there is already a matching customer. In this case, you can select one of the suggestions to open the respective customer page. Alternatively, you can ignore the suggestions and create the customer with the desired data
Nevertheless, if CM.Track V1 or CM.Track V2 is active in your system, there are some special data fields:
-
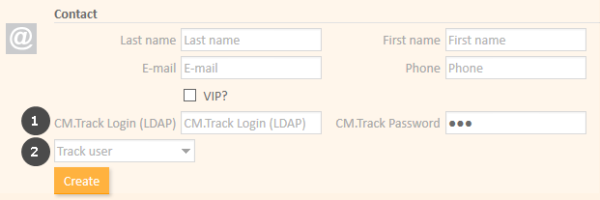
CM.Track login data (1)
The names of these data fields depend on the individual configuration of your CM system, but there is usually one field for the user name and one field for the password. Fill out these fields with the values which the customer should use to access CM.Track.The user name has to be unique. Every customer in your CM system needs to have a different user name. For security reasons, the password is displayed as dots and its value is not written to the ticket history.
-
CM.Track user profile (2)
This drop-down list is called Track user. Select the user profile which should be used to grant access to CM.Track. If you don't make a selection here, the customer cannot use CM.Track.
Your CM system can be configured to allow CM.Track access only for specific customer groups. In this case, the CM.Track login data fields may only be available in some of the customer groups.
Figure 91: Data fields for CM.Track
The Track user field is always visible, also if CM.Track is not active in your system or not configured for the current customer group. In this case, you can simply ignore the field.


