Managing contacts
Changes to contact data are always global changes, i.e., it does not matter where you carry out a change, it will always affect all places where this contact is used (contact page and cases). This is because ConSol CM keeps the contact data in a central contact database.
Accessing existing contacts
If you want to see all details about a contact, you have to open its contact page. There are several ways to access the contact page of an existing contact:
- Opening a contact page from the contacts section of a case.
- Opening a contact page using the link in the case list.
- Searching for a contact using the Quick Search or the Detailed Search.
- Opening a person page using the link in the persons section of a company page.
- Opening a company page using the Jump to company link in the context menu of a company in the header section of a person page.
- Opening a contact page via a relation (e.g., in the section for related contacts of a resource page, or in the section for related contacts of another contact page).
Updating contacts
Editing contact data
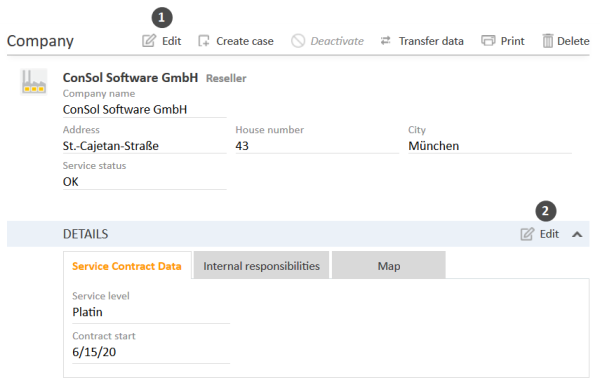
You can edit contact data using the Edit button in the header section or the Edit button in the details section provided that you have the required permissions.
Figure 95: Editing contact data
- (1) Click the Edit button in the header section of the contact.
- (2) Click the Edit button in the upper right corner of the details section.
The section's background turns yellow to indicate that it is in edit mode. Edit the contact data as required (see Data fields for details about the different types of data fields). Click Save changes to save the new data. The section background turns gray again (view mode).
You can also edit contact data within a case where the contact is added as the main contact or as additional contact (see Editing contact data).
Associating a person with another company
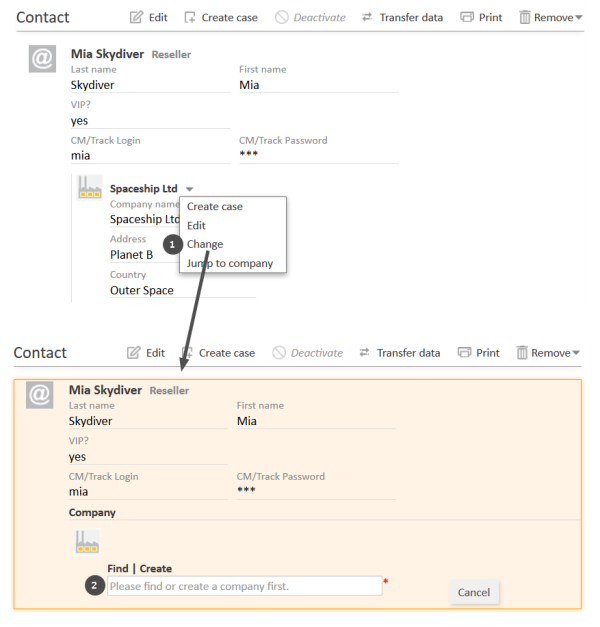
If a person is linked to the wrong company, you can fix this on the person page. There you can change the company which a person belongs to.
To do so, please proceed as follows:
- Open the person page and click the Change link in the context menu of the associated company.
- Provide the desired company:
- Start typing the company name and select one of the suggestions from the Autocomplete Search.
- Click the Create link to create a new company (see Creating a contact).
Figure 96: Changing the company of a person
Editing comments and attachments
The comments and attachments section of the contact page allows you to add comments and attachments to the contact. The respective permissions are granted independently from the permissions to read and write contact data, so it is possible that you cannot view or edit this section.
You can use the comments and attachments section to collect information about the contact which is not related to a specific case, e.g., adding the contact's service contract as an attachment, or writing a comment about the best way to contact the person.
Adding attachments
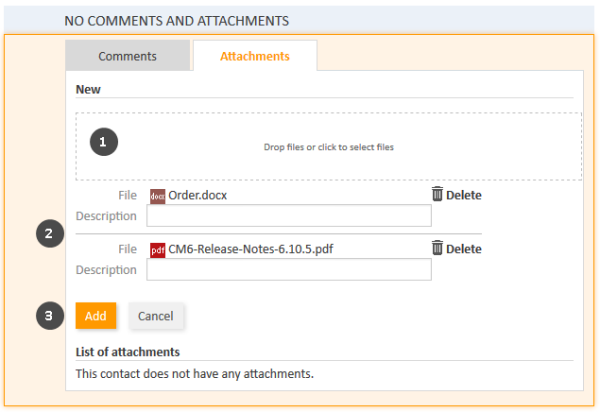
To add an attachment, click the Attachment link in the header of the section. The section background turns yellow to indicate that it is in edit mode. If the section is already in edit mode, you can also add an attachment by clicking the Attachment tab.
Figure 97: Adding an attachment
Please proceed as follows to add an attachment:
- Specify the files to be uploaded by either:
- Dragging and dropping them into the white area.
- Clicking into the white area to open a file browser dialogue and selecting the files.
- The selected files are displayed in a list below the white area. Optionally, you can add a description in the Description field. Click the Delete link to remove a file from the list.
- Click the Add button to upload the files to the contact page.
The attachments are then displayed in the list of attachments below (still empty in the above figure).
The list of attachments provides the following information. You can filter the list using the drop-down boxes and text fields in the header:
- File type
Indicates the file type of the attachment. - Name
Indicates the file name of the attachment. Click the file name to download and open the attachment. - Description
Indicates the description provided when the attachment was added, if any. - Date
Indicates the date when the attachment was added. - Added by
Indicates who added the attachment. This can be either a user (who uploaded the file) or a technical user (in case the file was automatically uploaded by the system). - Action
Provides links to the available actions. These are:- Apply filters
Filters the list according to your selections in the header. - Clear filters
Removes the filter, i.e., displays all entries.
- Apply filters
You can delete an attachment by clicking the cross on the right. Click OK in the red field to confirm the removal of the attachment. You cannot undo the removal once you confirmed it.
The possible file formats, maximum file size, and whether attachments are searchable depend on the individual configuration of your CM system.
Adding comments
To add a comment, click the Comment link in the header of the section. The section background turns yellow to indicate that it is in edit mode. If the section is already in edit mode, you can also add a comment by clicking the Comment tab. Enter the comment and click Add. The comment is then displayed in the list of comment below.
The list of comments provides the following information. You can filter the list using the drop-down boxes and text fields in the header:
- Date
Indicates the date when the comment was added. - Added by
Indicates who added the comment. This can be either a user (who entered the comment) or a technical user (in case the comment was automatically created by the system). - Comment
Shows the comment. - Action
Provides links to the available actions. These are:- Apply filters
Filters the list according to your selections in the header. - Clear filters
Removes the filter, i.e., displays all entries.
- Apply filters
You can delete a comment by clicking the cross on the right. Click OK in the red field to confirm the removal of the comment. You cannot undo the removal once you confirmed it.
Printing a contact page
You can print a contact page by clicking the Print link in the upper right corner of the contact page. A pop-up window is displayed where you can select the desired printer.
Performing contact activities
Contact activities allow you to perform certain actions for the current contact. You can find them in the Activities box next to the open contact page. Depending on the availability for a company or a person, the activity is called company activity (company action) or person activity (person action). Click the desired activity to perform the corresponding action.
Figure 98: Company activities
Examples for contact activities are:
- Create a new case for the person.
- Open the company's website.
- Load contact data from an external source.
Contact activities can have a form which needs to be filled out before proceeding. See Forms for activities for further information.
The available contact activities depend on the type of contact (company or person), his customer group, and the individual configuration of your CM system. You can only perform contact activities if you have the required permissions to perform activities for this customer group.
Managing the contact's cases
Creating a case for the contact
The contact page provides a convenient way to create a new case for this contact. Please proceed as follows:
- Open the contact page.
- Click the Create case button in the header section.
-
Fill out the required data on the Create case page and click Create.
- The current contact is already selected as the main contact of the new case.
- You can only select processes to which the customer group of the current contact is assigned.
Please see Creating a case for further information about case creation.
The Create case option is not available for companies in two-level contact models where cases can only be created for persons.
Transferring data to another contact
You can transfer the data of one contact to another contact. This is necessary for example if you want to deactivate or delete the contact. It depends on the type of contact which data is transferred:
- Persons: Only cases (if you reach this screen after clicking the Delete button, resources are transferred as well)
- Companies: Cases, persons, and resources
Please proceed as follows:
- Open the contact page.
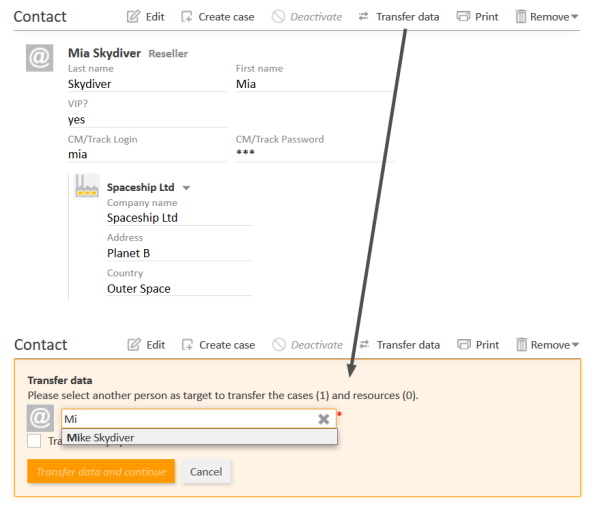
- Click the Transfer data button in the header section.
-
Select the contact who should receive the data using the Autocomplete Search.
The checkbox Transfer only open cases determines if you transfer only open cases (checkbox selected) or both open and closed cases (checkbox not selected). Select the checkbox if you want to deactivate the contact afterwards. Leave it unchecked if you want to delete the contact, as you have to move all cases in this case.
- Click Transfer data and continue. The new contact will replace the previous contact in the cases of the selected state (open / open and closed). This applies both to cases where the contact is the main contact and to cases where the contact is an additional contact. In case of a company, the new company also receives the persons and the resources of the previous company. In case of a person which should be deleted, resources are transferred as well as cases.
Figure 99: Transferring cases to another contact
If you use the Transfer data option, only data for which the current user has access permissions is transferred. If you transfer data because you are deleting the contact, all contact data is transferred.
Making contacts unavailable
There are several ways to make contacts unavailable and/or remove contact data. The appropriate option depends on your use case.
|
Option |
Use case |
|---|---|
|
Deactivate |
The contact is inactive. He has no open cases and should not be used for new cases. Nevertheless, you want to keep his data and you might want to reactivate him later. |
|
Delete (keep related data) |
You do not need the contact anymore. He has no cases and is not going to be used anymore. |
|
Anonymize |
The person has requested that all his data should be removed according to GDPR (General Data Protection Regulation). You still need the person for reports though. |
|
Delete (with all related data) |
The person has requested that all his data should be removed according to GDPR (General Data Protection Regulation). He is not needed for reports anymore. |
These actions cannot be undone except for deactivating the contact.
Deactivating a contact
The following table provides a summary of the preconditions and implications of deactivating a contact:
| Deactivating a contact | |
|---|---|
| Type of contact | Company or person |
| Preconditions |
|
| Reversal | Can be undone by reactivating the contact. |
| Implications |
The following actions are not possible anymore:
The following actions are still possible:
|
You can deactivate a contact on his contact page. The preconditions for deactivating the contact (see table) have to be met and you need the corresponding permission.
Please proceed as follows:
- Open the contact page of the contact.
- Click the Deactivate button in the header section.
- The contact is deactivated. If you deactivate a company, all the persons of the company are also deactivated.
Deleting a contact with Delete (keep related data) / Delete
The following table provides a summary of the preconditions and implications of deleting a contact. For persons, this option is called Delete (keep related data) and for companies it is called Delete.
| Deleting a contact (keep related data) | |
|---|---|
| Type of contact | Company or person |
| Preconditions | The contact must not be the main contact or an additional contact of any case (both open and closed). |
| Reversal | Cannot be undone. |
| Implications |
|
You can delete a contact on his contact page, provided that you have the required permissions.
Please proceed as follows:
- Open the contact page, i.e., the company or the person page.
-
For persons: Click the Remove button in the header section and select Delete (keep related data).
For companies: Click the Delete button in the header section. - If the contact still has (open or closed) cases or related resources, you need to transfer this data to another contact (see Transferring data to another contact). In case of a company, the persons belonging to the company have to be transferred as well.
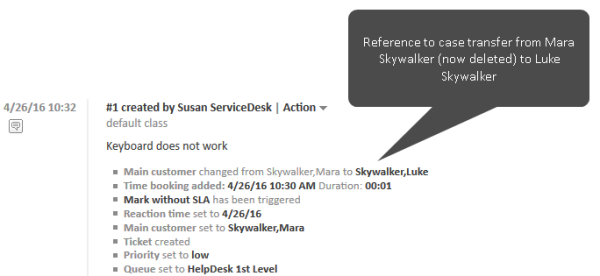
- The contact is removed from the system. A reference regarding the data transfer remains in the case history (see following figure).
Figure 100: History entry after data transfer
We recommend not to delete contacts because this has a huge impact on the data history. You won't be able to find the cases which belonged to this contact anymore. The case history entries relating to the contact will remain in the case though.
Deactivate the contacts instead!
Anonymizing a person
The following table provides a summary of the preconditions and implications of anonymizing a person:
| Anonymizing a person | |
|---|---|
| Type of contact | Person |
| Preconditions | None |
| Reversal | Cannot be undone. |
| Implications |
It depends on the individual configuration of the CM system, which person and case fields are marked to contain personal data. |
You can anonymize a person on his person page if you have the corresponding permission.
Please proceed as follows:
- Open the person page of the person.
- Click the Remove button in the header section and select Anonymize.
- The person is anonymized (see implications in the table above).
Deleting a person with Delete (with all related data)
The following table provides a summary of the preconditions and implications of deleting a person using the option Delete (with all related data):
| Deleting a person (with all related data) | |
|---|---|
| Type of contact | Person |
| Preconditions | None |
| Reversal | Cannot be undone. |
| Implications |
|
You can delete a person with his related data on the person page if you have the corresponding permission.
Please proceed as follows:
- Open the person page of the person.
- Click the Remove button in the header section and select Delete (with all related data).
- The person is deleted (see implications in the table above).
Making contacts available again
You can make a deactivated contact, which is displayed in italics, available again by reactivating him. To do so, please proceed as follows:
- Open the contact page of the contact.
- Click the Reactivate button in the header section.
- The contact is reactivated but he does not get his cases back (in case his cases were transferred to another contact before deactivating him). If the contact is a company, its persons remain deactivated. You have to reactivate them one by one.
