Introduction to the ConSol CM Web Client
This section describes the user interface of the ConSol CM Web Client and the most important objects.
Objects in ConSol CM
The following objects are important for working with ConSol CM:
- Case: The case is the request of the contact which the user works on. The user carries out the necessary steps as defined in the business process. The progress, including internal and external communication, is documented in the case. The business process can involve several users and different teams. When the request is solved, the case is closed. Closed cases are not lost, but they represent a powerful archive and knowledge base.
- Contact: The contact is the reason for opening a case. Usually, this is a customer who has a request. A case can have one main contact and several additional contacts. Depending on the defined data model, you can have a hierarchy consisting of companies with persons, who belong to a company.
- Resource: A resource is an asset, e.g. a product, which is used in the business process. It is usually related to a case, a contact or another resource.
- User: A user is the person who works with the Web Client to handle the requests which are managed as cases. Every case can be assigned to one user, the assignee, who is currently responsible for the case. If other users have a specific task within the process, they can be added as participants. Every user has one or several roles which define the users’ access permissions to work with cases, contacts and resources.
- Workflow: The workflow implements the business process. It consists of several steps, which are called activities. There are manual activities, which are performed by the users, and automatic activities, which are performed by the system. The activities are arranged in scopes to illustrate the status of a case. The intelligence of the process, like conditions, decisions, escalations, reminders, automatically sent emails, or other actions, is also defined in the workflow.
- Process: The process, also called queue, usually reflects the organizational structure of the company. For example, there can be one process for each department, as each department has its own way of working. The process links the different objects and determines:
- if the cases have contacts
- how the cases should look like (case data fields)
- whose cases are processed (customer groups)
- how its cases are processed (workflow)
- who can work on the cases (permissions)
Login and logout
You can log in to the system by opening the login page and entering your username and password. On some systems, you are logged in automatically with your Windows user.
You can log out by clicking the Log out button in the user menu. An automatic log out occurs when your session times out. In both cases your workspace is deleted.
If you are logged in automatically and want to log in with another username, click the Log out button in the user menu and enter the desired username on the login page.
If two-factor authentication is enabled, you will receive an email with a confirmation code after entering your username and password. You need to enter this code for logging in.
Elements of the page
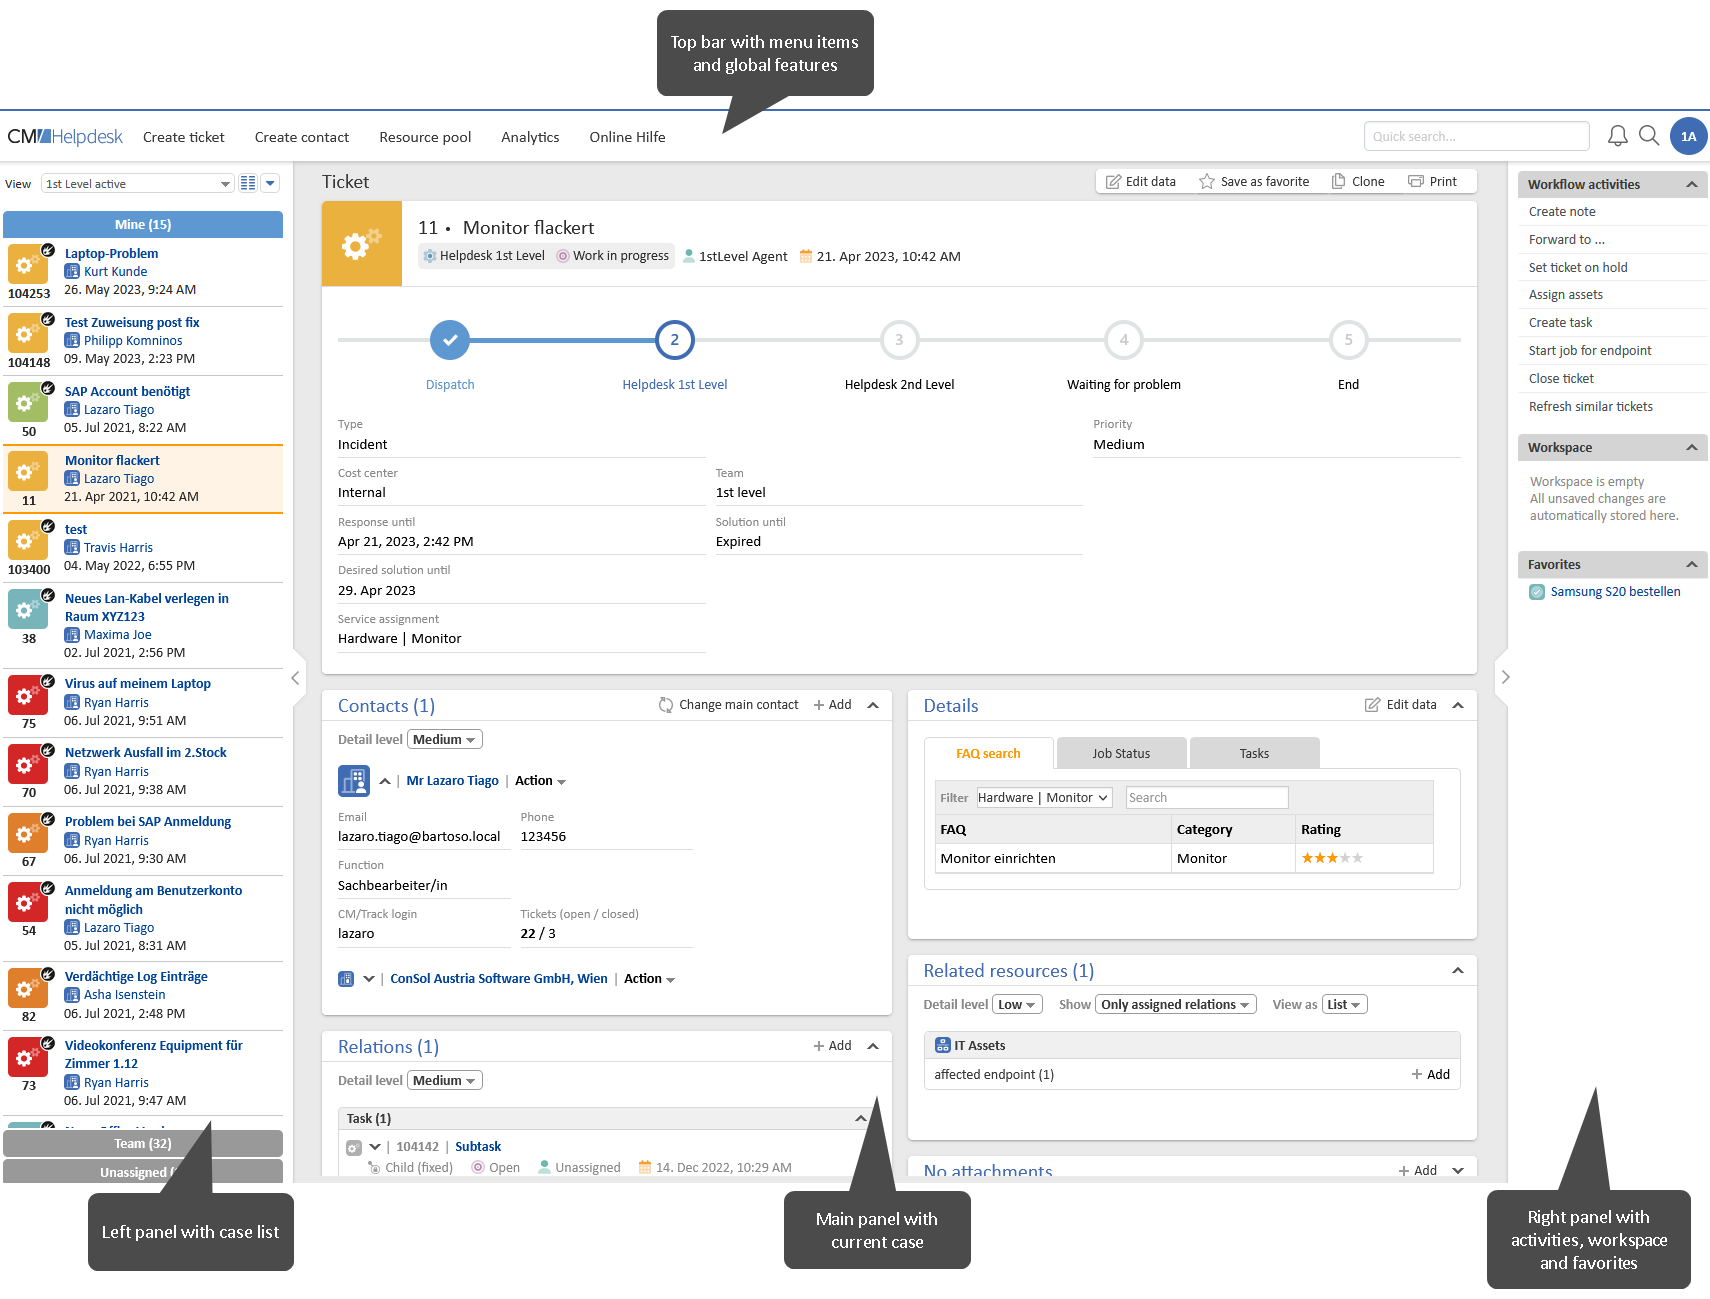
The user interface of the Web Client is structured in four areas:
- Top bar: Contains the buttons of the menu bar and global features such as the customer group filter, the quick search, the detail search, the notifications and the user profile.
- Left panel: Contains the case list. This panel can be collapsed.
- Main panel: Contains the object which the user works on. This can be a case, a contact, or a resource. Alternatively, the detail search, user profile or dashboard is shown in the main panel.
- Right panel: Contains the activities which are available for the case, contact, resource or detail search displayed in the main panel. Below the activities, the workspace and the favorites are shown. This panel can be collapsed.

Design principle
Object sections
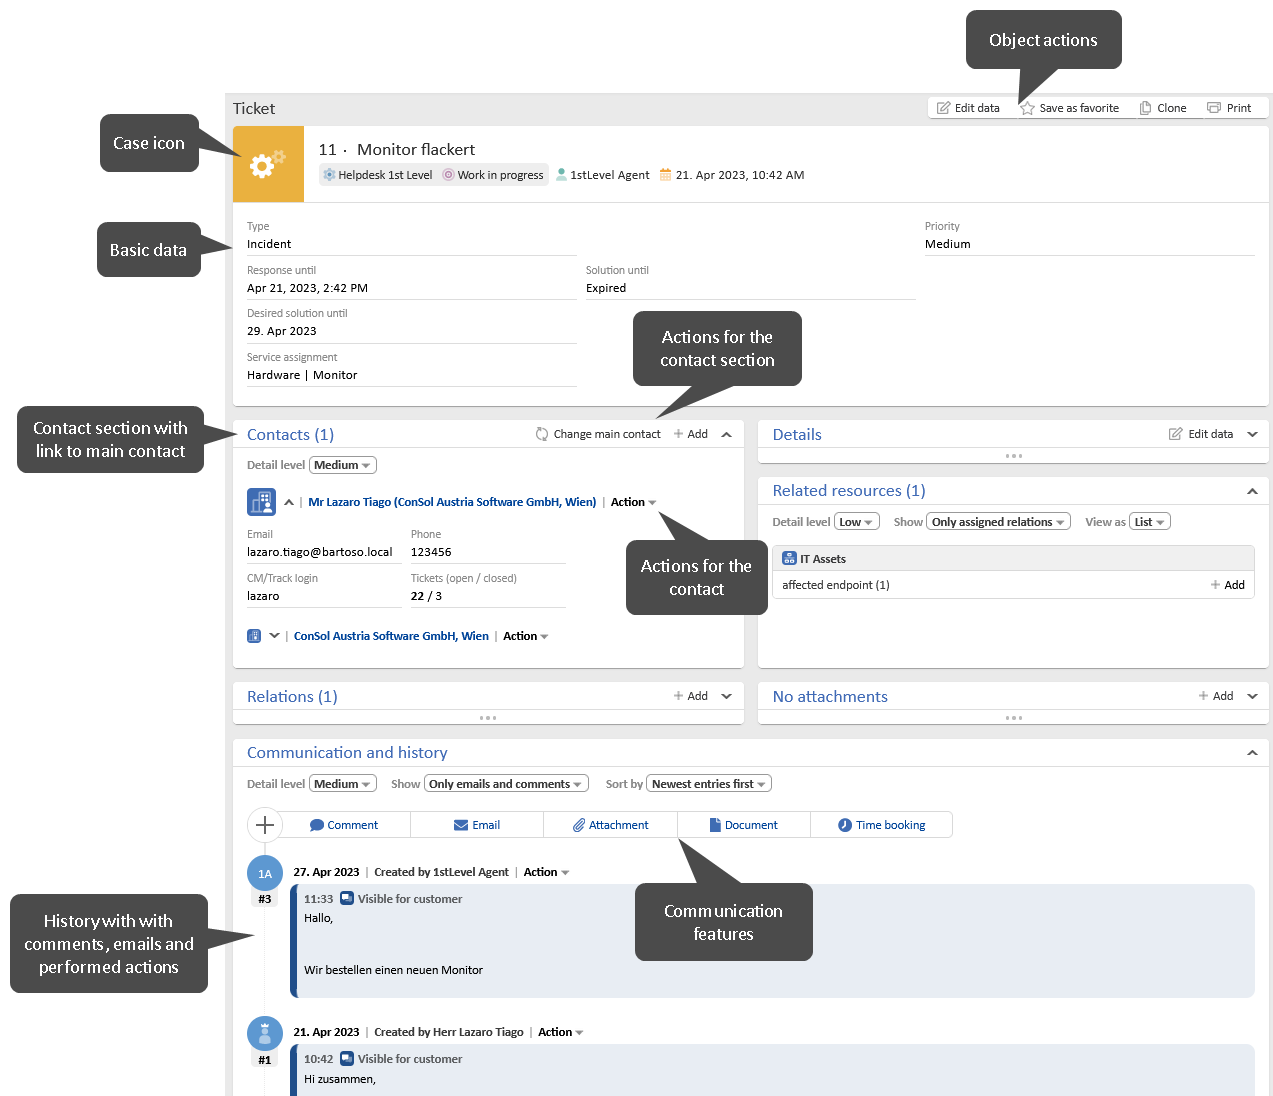
Cases, contacts and resources are displayed in the main panel. They consist of a header and several sections. The header contains the buttons which refer to actions which apply to the whole objects. Below, the basic data of the object is shown.
Every object has an icon which provides some information about it:
- Case: The symbol indicates the scope, i.e. the location within the workflow. The color indicates the value of a case field. The icon can have overlays which are added when a specific event has occurred.
- Contact: Indicates the data model.
- Resource: Indicates the resource type.
Each section has a specific purpose. The section header contains the buttons which apply to the content of the section. The following sections can be present:
| Section | Purpose | Available for |
|---|---|---|
| Details | Contains additional data fields in one or several tabs or pills. | All objects |
| Contacts | Contains the main contact and the additional contacts of a case. | Cases |
| Cases | Contains the cases of the contact. The case table can be filtered. | Contacts |
| Persons | Contains the persons which belong to a company. | Companies |
| Related cases | Contains the cases connected to the current object. | Cases and resources |
| Related resources | Contains the resources related to the current object. | All objects |
| Related contacts | Contains the contacts related to the current object. | Contacts and resources |
| Communication and history | Allows to send emails, write comments, add time bookings and attach documents, and contains the history of all changes made to the case and all actions taken. In addition, the history display can be modified. | Cases |
| History | Contains the history of all changes made to the object and all actions taken. | Contacts and resources |
| Attachments | Contains the attachments of the case, which the user can download or delete. | Cases |
| Comments and attachments | Contains comments and attachments related to the object. | Contacts and resources |
| Calendar | Contains an integrated Microsoft Outlook calendar. | All objects |
The following example shows a case. The header of empty sections is shown in gray. You can add content to the sections by using the section buttons on the right of the section header.

The sections provide easy access to the objects which are related to the current object. Usually, they contain links to open them in the same or another tab. You can expand and collapse the sections. Sections which contain tables allow adjusting the tables.
Drag-and-drop
Drag-and-drop is possible for several actions:
- Add objects to the workspace and the favorites
- Add a case relation
- Update a case in a grid
To use drag-and-drop, you need to drag the object icon to the desired place.
Contexts menus
Context menus provide actions for referenced objects, e.g. the contact of a case or a related object. They can be accessed by clicking the Action text with a small arrow, or the small arrow next to the object.
FAQs
Why does my Web Client look differently?
ConSol CM provides many customization features which allow your organization to adapt the system to your requirements and use cases. This means that every system has its own processes with the respective activities, and the objects have the data fields needed to support these processes. Object sections and features which are not required in the processes can be hidden.
In addition, the following general aspects can be customized:
- Layout: Colors, fonts and images
- Menus: Items of the main menu and the context menus
- Dashboard: Content and layout of the dashboard
- Labels: Naming of objects in the Web Client