Finding an object
Case list
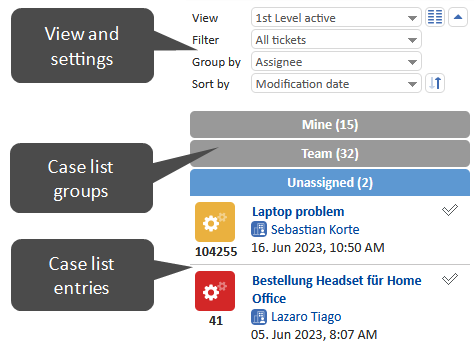
The case list is located on the left side of the screen. It shows the cases which you and your team work on and serves as a to-do list. The case list is structured in several groups, so you can locate the cases which you need to handle more easily. You can select a view to determine which cases should be included in the case list. The settings for the case list are described in Case list settings.

In addition to the list form you can also display the cases from the case list as a grid in the main panel. Alternatively, you can display the cases of certain groups in the detail search by clicking the icon in the group header.
Quick search
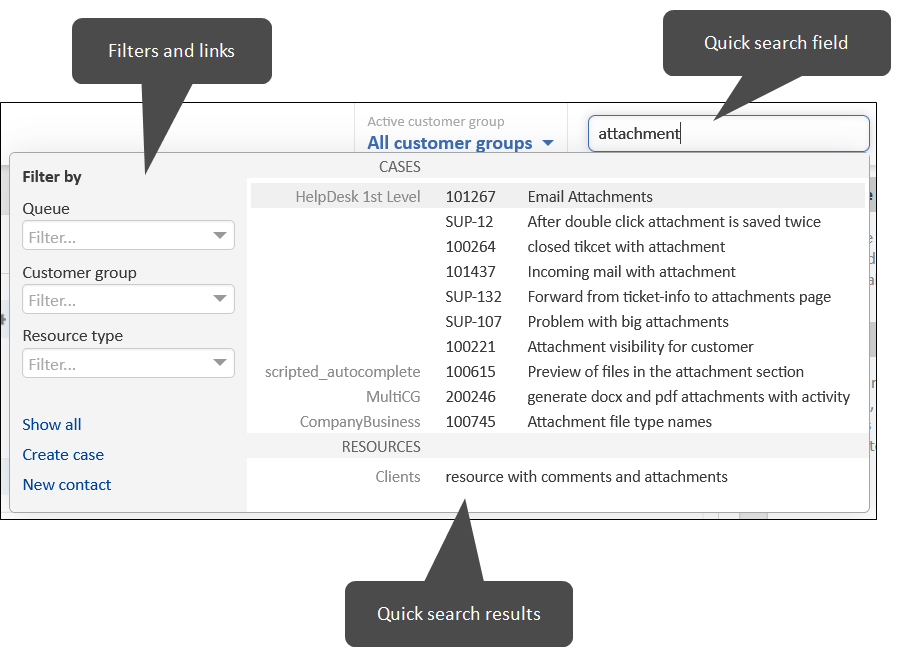
You can use the quick search by typing a keyword in the search field in the menu bar. When you click the search bar for the first time, hints about the usage of the search are shown. You can enter several keywords, separated by a space, to find objects which contain all the keywords. The matching cases, contacts and resources are displayed in the results window below the search field.

If automatic wildcards are enabled in your system, the * wildcard is automatically appended to the end of each keyword. You can also add wildcards manually. Note that wildcards at the beginning of a keyword slow down the search.
If the phonetic search is enabled in your system, the quick search also returns results which have a similar pronunciation but a different spelling.
The following object content is considered for the quick search:
- All objects: data fields configured to be searchable
- Cases: number, subject, name of the contact, name of the assignee or participant
- Contacts: company
- Resources: resource type
You can filter the search results using the options on the left. The quick search only shows a limited number of results. You can see all the results by clicking the Show all link to open the detail search. Alternatively, you can narrow down the search by entering more characters or search terms. If you enter two terms, you see results which contain both of them.
Detail search
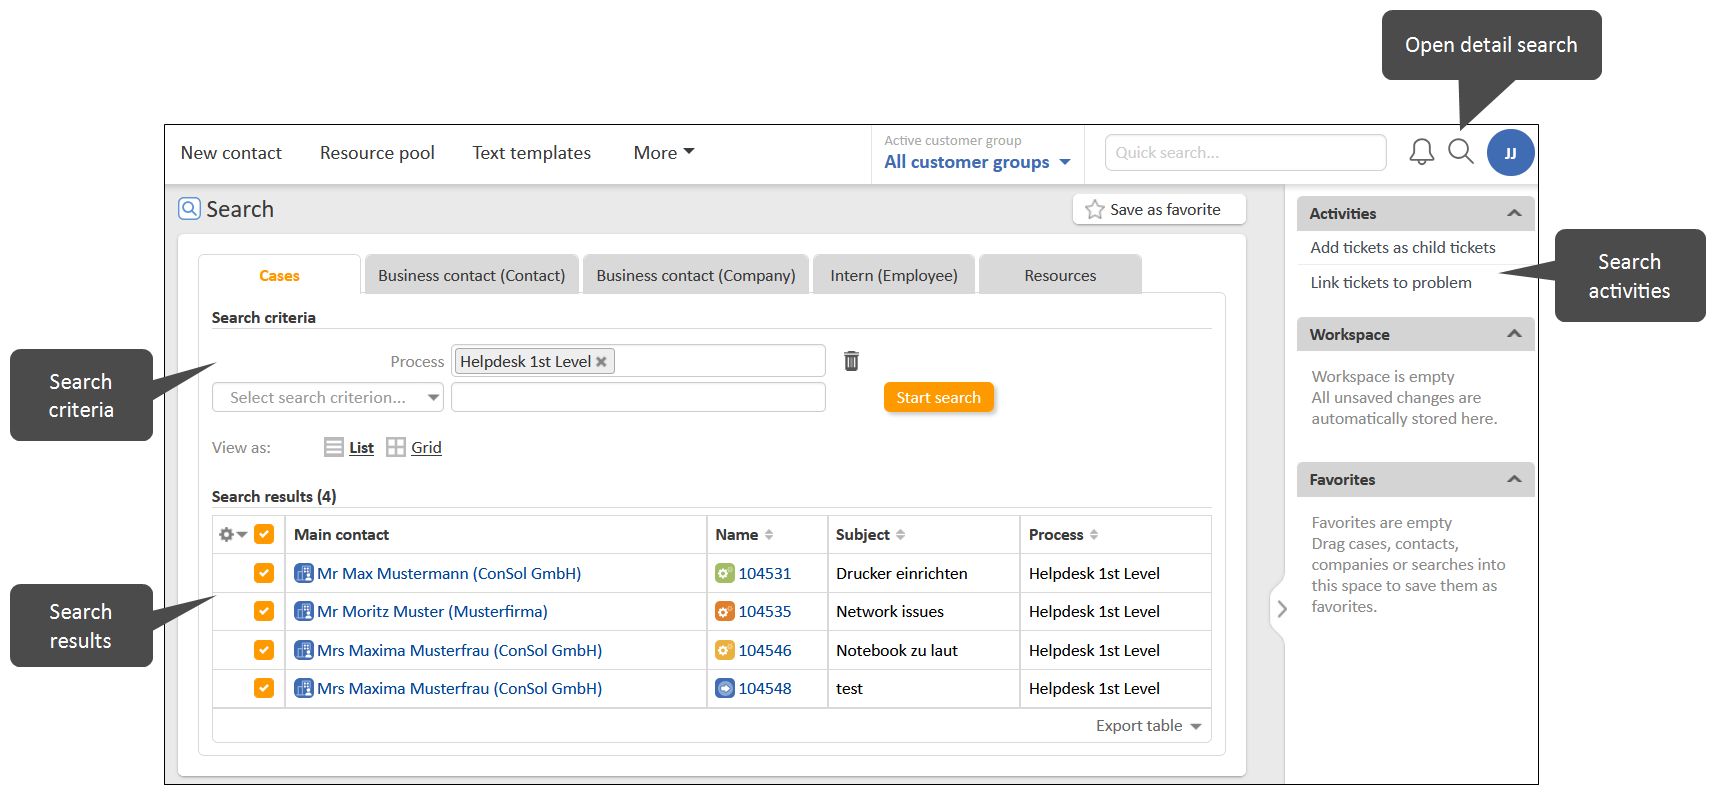
The detail search is an extended search in the main panel. It allows to combine several search criteria and to perform actions with the search results. You can access the detail search directly by clicking the magnifying glass icon in the menu bar or by clicking the Show all link in the quick search. In the latter case, the search words from the quick search are populated to the Free text (all fields, emails and comments) field.

The following search criteria are available:
- Cases: free text, status (open, closed), subject, process, assignee, participants, creation date, last modification date, close date, view, archivation state, changed by me, company, person, customer group, case and contact fields configured to be searchable
- Contacts: free text, case and contact fields configured to be searchable
- Resources: resource type, free text, resource fields configured to be searchable
You can add as many search criteria as you want to narrow down the search. Only objects for which all search criteria apply are shown. If you switch the tab, the search criteria which are still relevant for the new tab are kept.
You can enable the phonetic search to include results which have a similar pronunciation but a different spelling in the search. For contacts and resources, you can choose to show deactivated objects.
You can perform the following actions with the search results:
- Adapt the result table.
- Save the search to your favorites.
- Open the page of an object by clicking its link.
- Open a preview by clicking a row which is not a link.
- Display the results as a grid.
- Perform an activity for the results in the currently selected tab. The activity is executed for all the selected elements on the current page. If a form is opened, you need to fill out the form first.
Autocomplete search
The autocomplete search is used inside other objects to allow searching for an object and selecting one of the search results for a specific purpose depending on the context. As soon as you type in the field, a list of suggestions is displayed. If the desired object is not part of the currently shown suggestions, narrow down the search by typing in more characters. You can use the asterisk to see possible entries.
Examples:
- Selecting a contact for a case
- Selecting the assignee for a case
- Creating a relation
Permissions
You can see only objects for which you have permissions. Permissions are granted by process for cases, by customer group for contacts and by resource type for resources. To view a case, you need to have permissions to view both the case and its main contact. Objects for which you do not have permissions are neither found in the search nor included in the case list.
Your permissions also determine if you are allowed to modify the objects which you can view and which other actions are available to you.