Text templates
Text templates facilitate the work of the Web Client users by providing them with drafts for emails and comments. In addition, the text of automatic emails or automatically added comments can be stored in text templates. Text templates help to keep emails consistent regarding wording and layout, and increase the productivity of the users who do not have to type as much text.
Text templates can include variables which are filled with data from the case where the template is used. Variables can retrieve case data, data of the case’s contact or assignee, and data of the current user.
When using a text template, the template content is inserted into the comment or email editor. The user can edit it as desired to create the final comment or email. It is possible to use several templates for a comment or email.
Text templates are saved on the Text templates page of the Web Client. Templates which are only used in the workflow and should not be available for selection in the Web Client, can also be saved on the Templates page of the Web Admin Suite.
Available settings for templates
Text templates have the following general settings:
- Name: Mandatory. The name of the text template. It must be unique within the language. On the overview screen, templates which have attachments are indicated by a small paperclip icon next to the template name.
- Group: Mandatory. The group which the template belongs to. This setting is useful to organize your templates and locate them more easily, both in the template administration and in the email or comment editor.
- Subgroup: Optional. The subgroup which the template belongs to. This setting is useful if your groups contain many templates.
- Language: Mandatory. The language of the template. This is useful if you communicate in several languages, so that you need to have the same template in each language. You can then use the language setting to retrieve the correct template in scripts.
- Usage: Indicates how many times the template was used, i.e. selected by a user in the template selector of a case, on the current ConSol CM system. Only shown on the overview screen.
- Release: Mandatory. The version number of the template. Only shown in the template details.
- Active: Mandatory. Indicates if the template is enabled or disabled. The checkbox is available in the template details. On the overview screen, the disabled templates are displayed in gray italics.
- Is workflow: Only available for templates of the type Include. Indicates whether the include can be used in letters in the Web Client or letters in the workflow. If the setting is No, the letter cannot be used in workflows. Otherwise, it can be used both in the Web Client and in workflows.
If a template uses data fields which are no longer available, the line of the respective template is displayed in red on the overview screen. The broken references are displayed in red, and you need to remove them to be able to save the template.
Types of templates
There are four types of text templates. A text template is always of one of the types.
- Letter: The text template which can be used for comments or emails.
- Include: Includes can be used within letters. They allow reusing text for several templates. A common use case for includes is the email signature, which is required for all email templates. When creating an include, you need to decide whether is should be available only for letters which are used in the Web Client, or for both letters which are used in the Web Client and in the workflow.
- Text block: Text blocks can be used within letters. They are useful for manual emails and comments because the user can choose which text blocks to include in the final comment or email. See Using text templates.
- Script: Scripts can be used within letters, includes or text blocks. They are written in Freemarker and allow adding logic to templates. If you want to use HTML tags in the script, you need to select the checkbox Allow HTML. Scripts can only be edited by users with administrator permissions. See Using scripts in text templates.
Template usage
There are four places where text templates of the type Letter can be used. You can select one or several of the places:
-
Workflow: The template can be used for emails and comments created automatically in the workflow.
Included elementsTemplates which can be used in the workflow must not contain text blocks or additional parameters, as these elements require manual interaction by the user.
-
Email: The template can be used for manual emails sent using the email editor in the Web Client.
-
Ticket create: The template can be used for comments written in the comment editor of the Web Client when creating a new case.
-
Ticket edit: The template can be used for comments added or edited in the comment editor of the Web Client in an existing case.
For text templates of the type Include, there is one setting:
- Is workflow: Indicates whether the include can be used in letters in the Web Client or letters in the workflow. If this checkbox is not selected, the letter cannot be used in workflows. Otherwise, it can be used both in the Web Client and in workflows.
Basic tasks
Finding a text template
The list of text templates is displayed directly after accessing the Text templates screen of the Web Client. You can filter the list to locate a template more easily:
- Text search: Enter a search term in the Enter template name or content field to perform a free text search in the template name and content.
- Template group: Select the template group or subgroup in the All groups drop-down list to display only templates which belong to a certain group.
- Queue: Select the queue in the All queues drop-down list to display only templates which are available in a certain queue.
- Template usage: Select the context in the Available for drop-down list to display only templates which are available in a certain context.
- Template type: Select the type in the Template type list to display only templates of a certain type.
You can select the checkbox Include inactive templates if you want to display disabled templates as well.
Managing text templates
You need to have the Manage templates permission or administrator permissions to manage templates, see Global permissions.
Set up a specific role for the users in charge of the text and document templates. Create a role with the permission Manage templates only and assign it to the users who create or edit templates.
Most actions to manage templates can be accessed from two places:
- Context menu: Click the name of the template in the Template name column and select an entry in the context menu.
- Preview: Click any column except for the Template name column and click one of the icons displayed on the left.
The following actions are available for templates:
-
Create a new template: Click the Create new template button above the list of templates. Fill out the basic template data (see Available settings for templates) and write the template content (see Writing text templates). If the new template is similar to an existing template, you can prefill the Create new template screen with the data of an existing template by selecting the Clone option.
-
Preview the attachments of a template: You can click the arrow icons in the preview of a template to display the attachments in the preview window.
-
Edit a template: Click the Edit icon of the template preview or select the Edit option from the template's context menu. You can update the basic template data (see Available settings for templates) or change the template content (see Writing text templates).
-
Disable a template: Click the Disable icon of the template preview or select the Disable option from the template's context menu. Disabled templates cannot be used anymore. They are displayed in gray italics on the overview screen.
-
Enable a template: Click the Enable icon of the template preview or select the Enable option from the template's context menu. Enabled templates can be used in the Web Client and workflow.
-
Delete a template: Click the Delete icon of the template preview or select the Delete option from the template's context menu to delete templates which are not needed anymore. Templates which are in use, either by the workflow or because they are referenced by other templates, cannot be deleted.
-
Set the default templates for comments and emails: Only available for templates of the type Letter. You can set a default template for both emails and comments. This template is inserted automatically in the editor when a user adds a comment or email. To set a template as default template, click the option Use as e-mail standard or Use as comment standard in the template's context menu. This option is only available if no other template is in use as standard template for emails / comments. If another template is already selected for this purpose, you have to remove this setting first by clicking Unset comment standard or Unset email standard in the context menu of the affected template. You can locate the default templates by looking for the text E-mail standard or Comment standard after the template name.
Usage of standard templatesUsually, a signature is used as a standard template for emails. A standard template must not contain text blocks or parameters.
Writing text templates
You can perform the following steps to write a text template:
- Create a template of the type Letter. You can enter text and format it using the rich text editor. In addition, you can insert variables from the library of template fields. See Using variables in text templates. You can add attachments to the template. If the template should only be available in specific queues or if specific data fields are filled out in the case, you can restrict the template accordingly. See Binding a text template. Alternatively, you can create a new template from an outgoing email in the case history. Click the entry Use as template in the context menu of the email to open the template creation screen.
- Optional. Add attachments to the letter. When selecting the template in the comment or email editor, the attachments are preselected. They are attached to the case upon saving the comment or sending the email. When an email template with attachments is used by the workflow, the attachments are ignored.
- Optional. Create a template of the type Text block. You can enter text and format it using the rich text editor. See Using variables in text templates.
- Optional. Create a template of the type Include. You can enter text and format it using the rich text editor. In addition, you can insert variables from the library of template fields. See Using variables in text templates. You can use all kinds of variables except for text blocks and other includes. A common use case for includes is the email signature, which is added to all letters used for emails.
- Optional, administrator permissions required. Create a template of the type Script. You can enter text and use Freemarker code to add logic. If you select the Allow HTML checkbox, you can use HTML tags to format the script content.
- Optional. Reference text blocks, includes and scripts in the letter. See Using variables in text templates.
It is not possible to use executable JavaScript code in text templates. Any <script> tags are escaped automatically by the system.
You can view the source code of the template by clicking the Code view button in the rich text editor.
Using variables in text templates
The library of template fields allows to insert variables into text templates. There are four kinds of variables:
-
References to other text templates (includes, text blocks, scripts): The referenced templates are included automatically. The only case where there is user interaction are text blocks, which the user can select or deselect.
Usage implicationsText blocks are not available in letters which can be used in the workflow.
-
References to case and contact fields: The referenced fields are automatically replaced by their values in the current case / case contact. If the field is empty, it is omitted in the template. No user interaction is required.
Usage implicationsIf you use contact fields, the template is only available in cases whose main contact belongs to a customer group whose data model includes the respective fields.
-
Parameters to be filled out by the user: There are two kinds of parameters: string parameters and enum parameters. The user needs to fill out the variable when using the text template.
Usage implicationsParameters are not available in letters which can be used in the workflow.
-
Links: Links to the current case are automatically replaced by a hyperlink to the case in the Web Client or CM/Track.
Usage implicationsText templates which contain link variables do not work on the case creation page. Therefore, the option Ticket create must not be selected in the Available in drop-down list for the template.
The system properties
cmas-core-server,url.track.authandcmas-core-server,url.webclientmust be set because they determine the system URL used in the hyperlinks.
The following table lists the available variables with a short description. Different colors are used in the template administration to make it easier to distinguish between the different kinds of variables.
| Variable | Description | Color |
|---|---|---|
| Customer data models | Allows to insert contact fields. Select the customer group and contact object (company or person) to see the available data fields. | Blue |
| Customer Group | Allows to insert the name of the customer group. | Blue |
| Queue | Allows to insert the name of the queue. | Blue |
| Custom fields | Allows to insert case fields. Select the field group to see the available data fields. | Blue |
| Ticket | Allows to insert basic case data (ID, name, subject, creation date, escalation date). You can click the Engineer option to insert data of the assignee, e.g. the name or phone number (see Users for details about the available fields). | Blue |
| Engineer | Allows to insert data of the current user, e.g. the name or phone number (see Users for details about the available fields). | Blue |
| Includes | Allows to insert templates of the type Include. | Orange |
| Text blocks | Allows to insert templates of the type Text block. | Green |
| Workflow includes | Allows to insert templates of the type Include which have the option Is workflow checked, so that they can be used in templates which are used in the workflow. | Orange |
| Scripts | Allows to insert templates of the type Script. | Lila |
| String parameter | Displays a text field above the comment / email editor where the user can enter a text which is inserted in the configured place within the template. | Red |
| Enum parameter | Displays a selector above the comment / email editor where the user can select one of the enum values to insert it in the configured place within the template. | Red |
Please proceed as follows to insert references to text templates and fields:
- Place the cursor at the desired position within the text.
- Navigate to the desired item in the Library of template fields section and click to insert the item.
Please proceed as follows to insert parameters:
- Place the cursor at the desired position within the text.
- Insert the parameter in the Library of template fields section:
- String parameter:
- Click Add string parameter.
- Enter the name of the parameter in the field below New parameter.
- Click Add parameter.
- Enum parameter:
- Click Add enum parameter.
- Enter the name of the parameter in the field below New parameter.
- Select an enum. The checkbox Template enabled needs to be selected for the enum on the Enumerated lists page.
- Click Add parameter.
- String parameter:
See Using parameters for information about the user perspective.
Binding a text template
The binding determines in which cases a letter template is available. The availability of a text template depends on two factors:
-
Settings in the Binding section of the template: You can limit the availability of templates depending on the queue and case fields. The following settings are available:
- Queue: Select the queue which the case has to be in.
- Custom field: Select the value which needs to be set for a case field (only fields of the type Sorted list).
You can add several criteria by using the + icon. The following rules apply when combining several criteria:
- Queue: Several queues are combined with OR, i.e. the case needs to be in one of the queues.
- Case field: Several case fields are combined with AND. Several values of the same case field are combined with OR. This means that the case needs to have one of the specified values for each of the case fields.
- Queue and case field: Queue and case fields are combined with AND, i.e. the case needs to be in the selected queue and have the specified value in the given case field.
There are two kinds of binding: soft and hard. By default, the hard binding is used for all criteria, meaning that the template is only available if the criterion is met. You can select the checkbox soft next to a criterion to allow the Web Client users to "overwrite" the binding. In this case, the users can display the template by unchecking the option Show templates suitable for this context in the template selector of the email / comment editor, when the criterion is not met.
-
Customer group of the case's main contact: If variables from customer data models are used (see Using variables in text templates), the template is only available if the case's contact belongs to a customer group with the respective data model.
If you do not need all the case fields of the type Sorted list for text templates, you can exclude specific case fields using the page customization of markersLibrary. This improves the load time of the template details page because the excluded field do not need to be loaded in the Binding section.
Using text templates
Text templates can be used in the comment and email editor of the Web Client and in the workflow. Text templates which are used in the workflow work in the same way as regular templates (see Using templates in scripts).
The following section describes how users work with text templates in the Web Client.
The user can select the desired templates in the Add template selector of the comment and email editor. He can edit the template text before saving the comment or sending the email. If a default template is used, the user can remove or edit the content of this template. The template is inserted as text, the text which belongs to variables has the same color as in the template administration. The purpose of the colors is to highlight the parts which are dynamically retrieved, the sent email or saved comment does not have these colors.
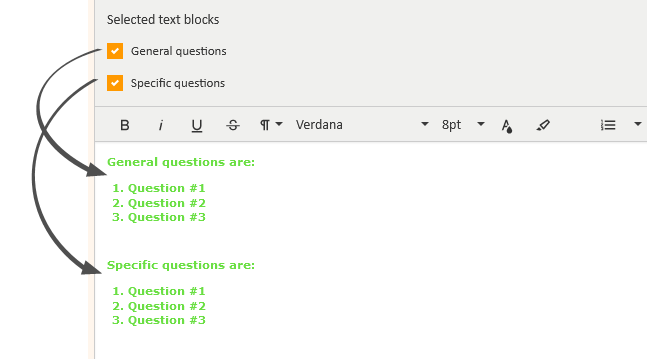
The following figure shows a template with two text blocks in the comment editor. Both text blocks are selected, so that they are included in the comment.
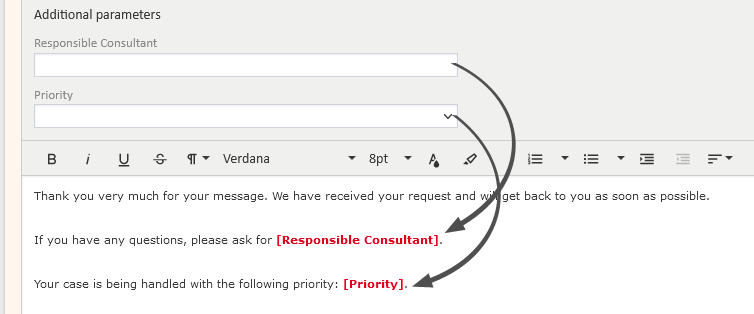
The following figure shows a template with one string parameter and one enum parameter. The user can provide the desired values above the editor to insert them.
You can configure several editor settings regarding templates in the page customization of mailTemplate.
Advanced tasks
Using scripts in text templates
Scripts allow to add logic to the templates. They can only be edited by users who have administrator permissions, see Global permissions. Using scripts you can implement for example customized salutations depending on contact fields.
Script templates are written in Freemarker (see https://freemarker.apache.org/). If you select the Allow HTML checkbox, you can use HTML tags to format the script content.
You have to use square brackets [] instead of the angle brackets used in standard Freemarker notation.
Scripts with the option Allow HTML can include links. The links have to start with one of the allowed protocols (http, https, ftp, ftps, file, mailto), otherwise they are removed.
Therefore, you cannot directly use a script function within a link to dynamically retrieve a complete link from a case or contact field. The following code using a function within the link tags in a script will not work:
<a href="${ticket.get('fieldgroup.field')}">My Link</a>
Instead, the field value must not include the protocol. You can use a variable which stores the return value of the function:
[#assign link=ticket.get('fieldgroup.field')!]
<a href="https://${link}">My link</a>
Special case: script which includes template with images
If the script is used to include templates of the type Letter or Include which contain images, you need to proceed as follows:
- Create the included template before you reference it in the script.
- Reference the included template using its name without locale, i.e. the syntax is
<#include "template name">. You cannot use variables for the template name. - The included template must be the same language as the letter.
If the script is used in a template for an automatic email, and the email content should be written to the case history, use the method workflowApi.addTicketTemplateText(String pTemplateName).
Coding example: queue-specific signatures
The following example shows a script template used to include a specific signature depending on the current queue of the case. This way, you can use different signatures for different departments of the company.
[#if ticket.queue.name??]
  [#if ticket.queue.name=="ServiceDesk"]
    [#include "Signature ServiceDesk"]
  [#elseif ticket.queue.name=="HelpDesk_1st_Level"]
    [#include "Signature Helpdesk"]
  [#else]
    [#include "Default signature"]
  [/#if]
  [#else]
    [#include "Default signature"]
[/#if]
Coding example: using lists and tables in templates
Data fields of the type list or struct cannot be selected directly using the library of template fields. Instead, you need to create a script and include it in the letter template. The Allow HTML checkbox needs to be selected for the script template. The following example shows how to write a script which displays the content of the struct order_list in the case field group helpdesk_standard. The table header is displayed in bold font and contains the field names.
[#if helpdesk_standard.order_list?has_content]
  <table>
    [#list 0..helpdesk_standard.order_list?size-1 as i]
    <tr>
      [#list helpdesk_standard.order_list[i] as value]
        [#if i==0]
          <td style="border:1px solid #d9d9d9; padding: 0 2px;font-weight:bold;">${value}</td>
        [#else]
          <td style="border:1px solid #d9d9d9; padding: 0 2px;">${value}</td>
        [/#if]
      [/#list]
    </tr>
    [/#list]
  </table>
[/#if]