Authentifizierung
Einführung in die Authentifizierung
Die Authentifizierung in ConSol CM erfolgt über die zusammen mit dem Produkt gelieferten Authentifizierungsanwendungen. Sie basiert auf OpenID Connect. Die Autorisierung, d.h. die Feststellung der Zugangsberechtigungen der authentifizierten Benutzer erfolgt über Rollen.
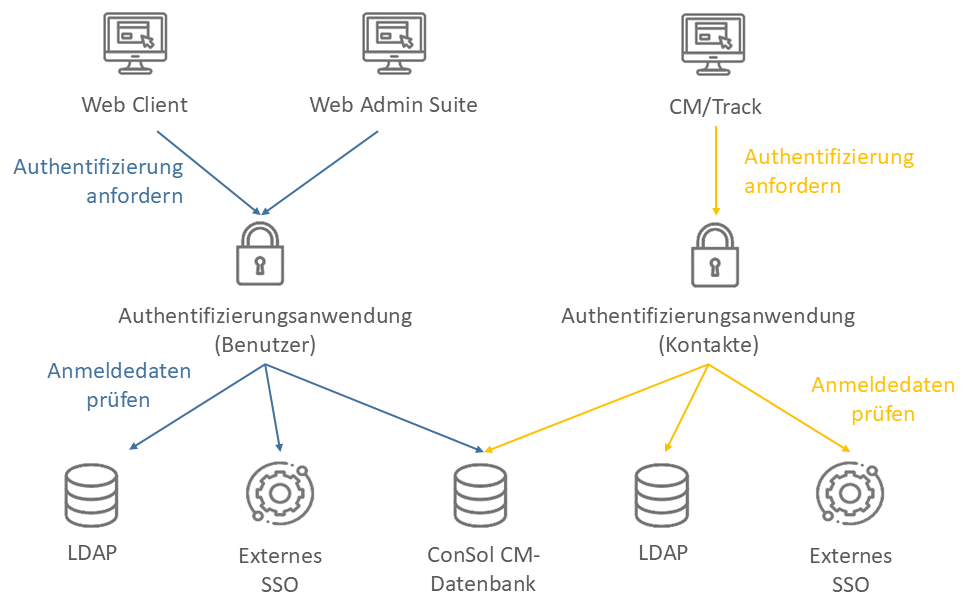
Es gibt zwei Bereiche für die Authentifizierung:
| Benutzergruppe | Clients | Authentifizierungsanwendung | Anmeldeinformationen |
|---|---|---|---|
| Benutzer | Web Client und Web Admin Suite | cm-auth-user.war oder cm-auth-user-standalone.jar | Verwaltung auf der Seite Benutzer der Web Admin Suite |
| Kontakte | CM/Track | cm-auth-portal-user.war or cm-auth-portal-user-standalone.jar | Verwaltung auf den entsprechenden Kontaktseiten im Web Client |
Es gibt drei Orte, aus denen die Authentifizierungsanwendung die Anmeldeinformationen der Benutzer abrufen kann, um ihre Identität zu bestätigen: die Datenbank von ConSol CM, einem LDAP-Server oder einem externen SSO-Dienst.
| Name | Speicherort der Anmeldeinformationen | Hinweise |
|---|---|---|
| Datenbank | Der Benutzername und das Passwort werden in der ConSol CM-Datenbank gespeichert. | Sie können eine Passwortrichtlinie einstellen und die Funktion zum Zurücksetzen des Passworts konfigurieren. |
| LDAP | Der Benutzername wird in der ConSol CM-Datenbank gespeichert. Das Passwort wird auf dem LDAP-Server gespeichert. | Die Benutzer oder Kontakte können Ihre Passwörter nicht in ConSol CM ändern. |
| SSO | Der Benutzername wird in der ConSol CM-Datenbank gespeichert. Das Passwort wird im Active Directory gespeichert und aus einer gültigen Windows-Session abgerufen. | Die Benutzer oder Kontakte können ihre Passwörter nicht in ConSol CM ändern. Es wird ein externer SSO-Provider wie Microsoft Active Directory Federation Services oder Azure AD benötigt. |
Die Standard-OIDC-Konfiguration für eine Authentifizierung anhand von Anmeldeinformationen aus der Datenbank oder LDAP wird automatisch auf der Seite System-Properties erzeugt. Für eine externe SSO-Authentifizierung müssen Sie die Properties mit den für Ihren SSO-Provider passenden Werten anpassen.
Grundlegende Aufgaben
Festlegen der Quelle der Anmeldeinformationen für Benutzer
Die Quelle für die Anmeldeinformationen für den Web Client und die Web Admin Suite wird über die System-Property cmas-core-security, engineer.authentication.method festgelegt. Mögliche Werte sind: "DATENBANK", "LDAP", "LDAP,DATENBANK", "DATENBANK,LDAP".
Wenn sowohl LDAP als auch Datenbank konfiguriert sind, werden die Authentifizierungsversuche in der folgenden Reihenfolge durchgeführt:
- LDAP,DATENBANK: Wenn eine LDAP-ID in den Benutzerdaten gespeichert ist, wird der erste Anmeldeversuch über die verfügbaren LDAP-Server unternommen. Schlägt die Anmeldung fehl, wird versucht, sich über die Datenbank anzumelden, sofern ein Benutzername und ein Passwort in den Benutzerdaten gespeichert sind.
- DATENBANK,LDAP: Wenn ein Benutzername und ein Passwort in den Benutzerdaten gespeichert sind, wird der erste Anmeldeversuch über die Datenbank unternommen. Schlägt die Anmeldung fehl, wird versucht, sich über die verfügbaren LDAP-Server anzumelden, sofern in den Benutzerdaten eine LDAP-ID gespeichert ist.
Je nach der konfigurierten Quelle der Anmeldeinformationen müssen Sie auf der Seite Benutzer der Web Admin Suite verschiedene Felder ausfüllen:
- Datenbank: Felder Login und Passwort.
- LDAP: Feld LDAP-ID
- Externes SSO: Feld Login
Die Anmeldedaten des Administrators, der während der Einrichtung erstellt wurde (siehe System-Property cmas-core-security, admin.login), werden immer in der Datenbank gespeichert. Wenn Sie nur LDAP als Authentifizierungsmethode mit internem OIDC verwenden, wird der anfängliche Administrator nicht mehr funktionieren. Daher müssen Sie zunächst einem in LDAP verwalteten Benutzer Administratorrechte zuweisen.
Festlegen der Quelle der Anmeldeinformationen für Kontakte
Die Quelle für die Anmeldeinformationen für CM/Track wird über die System-Property cmas-core-security, contact.authentication.method festgelegt. Mögliche Werte sind: "DATENBANK", "LDAP", "LDAP,DATENBANK", "DATENBANK,LDAP".
Wenn sowohl LDAP als auch Datenbank konfiguriert sind, werden die Authentifizierungsversuche in der folgenden Reihenfolge durchgeführt:
- LDAP,DATENBANK: Wenn eine LDAP-ID in den Kontaktdaten gespeichert ist, wird der erste Anmeldeversuch über die verfügbaren LDAP-Server unternommen. Schlägt die Anmeldung fehl, wird versucht, sich über die Datenbank anzumelden, sofern ein Benutzername und ein Passwort in den Kontaktdaten gespeichert sind.
- DATENBANK,LDAP: Wenn ein Benutzername und ein Passwort in den Kontaktdaten gespeichert sind, wird der erste Anmeldeversuch über die Datenbank unternommen. Schlägt die Anmeldung fehl, wird versucht, sich über die verfügbaren LDAP-Server anzumelden, sofern in den Kontaktdaten eine LDAP-ID gespeichert ist.
Je nach konfigurierter Quelle der Anmeldeinformationen müssen Sie auf der Seite Kontaktfelder der Web Admin Suite Felder für die Anmeldedaten in den Kontaktdaten anlegen. Diese Felder müssen im Web Client für alle Kontakte ausgefüllt werden, die Zugriff auf CM/Track oder die REST-API benötigen.
- Datenbank: Benutzername (Feld mit der Einstellung Benutzername für CM/Track) und Passwort (Feld mit der Einstellung Passwort für CM/Track)
- LDAP: LDAP-ID (Feld mit der Einstellung Benutzername für CM/Track und LDAP-ID für CM/Track).
- Externes SSO: Benutzername (Feld mit der Einstellung Benutzername für CM/Track).
Wenn die Datenbank verwendet wird, müssen Sie in der System-Property cmas-core-security, policy.track.username.case.sensitive festlegen, ob bei CM/Track-Benutzernamen zwischen Groß- und Kleinschreibung unterschieden werden soll. Setzen Sie sie nur dann auf "true", wenn die Kollation der Datenbank Groß- und Kleinschreibung unterstützt.
Konfigurieren der Authentifizierung
Im folgenden Abschnitt wird beschrieben, wie Sie die Authentifizierung mit den verschiedenen Quellen von Anmeldeinformationen konfigurieren.
- Database
- LDAP
- External SSO
Keine zusätzliche Konfiguration erforderlich.
Sie müssen die Verbindung zu mindestens einem LDAP-Server definieren. Dies geschieht in den folgenden System-Properties des Moduls cmas-core-security. In den Property-Namen werden zwei Platzhalter verwendet:
- <scope>: Legt fest, ob der LDAP-Server für die Benutzerauthentifizierung (Wert
engineer) oder die Kontaktauthentifizierung (Wertcontact) verwendet wird. - <name>: Ermöglicht es, Konfigurationen für mehrere verschiedene LDAP-Server zu definieren. Der Name muss immer angegeben werden, auch wenn Sie nur einen LDAP-Server konfigurieren. Sie sollten eine einfache Zeichenkette verwenden, die keine Schlüsselwörter wie
internaloderexternalund keine Sonderzeichen enthält.
Die Authentifizierungsversuche gegenüber den LDAP-Servern werden bis zum ersten Erfolg durchgeführt, beginnend mit dem ersten Server in aufsteigender alphabetischer Reihenfolge.
Setzen Sie die folgenden System-Properties auf der Seite System-Properties der Web Admin Suite:
- <scope>.authentication.method: LDAP
- ldap.<scope>.<name>.basedn: Der Wurzelpfad im LDAP-Baum, der zum Suchen des Benutzers/Kontakts anhand der LDAP-ID verwendet wird, z. B. ou=accounts,dc=mycompany,dc=de. ldap.<scope>.<name>.password: Das Passwort, das für die Verbindung zum LDAP-Server verwendet wird, um die Benutzer/Kontakte zu suchen. Wird nur benötigt, wenn die Suche nicht anonym durchgeführt werden kann.
- ldap.<scope>.<name>.providerurl: Die vollständige Adresse des LDAP-Servers im Format ldap[s]://host:port. Normalerweise ist der Standardport 636 und der Port für den globalen Katalog ist 3269.
- ldap.<scope>.<name>.searchattr: Suchattribut für die Suche nach einem Benutzer/Kontakt über die LDAP-ID, z.B. uid.
- ldap.<scope>.<name>.userdn: Der LDAP-Benutzer für die Verbindung zum LDAP-Server, um die Benutzer zu suchen. Wird nur benötigt, wenn die Suche nicht anonym erfolgen kann.
- ldap.initialcontextfactory: Dies ist eine vordefinierte globale Eigenschaft. Der Wert sollte
com.sun.jndi.ldap.LdapCtxFactorysein.
Siehe unten zur Konfiguration von LDAPS.
Sie müssen die Standard-OIDC-Konfiguration so anpassen, dass der externe SSO-Anbieter anstelle der ConSol CM-Authentifizierungsanwendungen verwendet wird. Dies kann für jeden Client separat erfolgen, indem Sie die folgenden Eigenschaften im Modul cmas-core-security auf der Seite System-Properties ändern.
Der Platzhalter <scope> wird in den Property-Namen für den Client verwendet, für den die OIDC-Konfiguration relevant ist. Dies kann der Web Client (Wert web), die Web Admin Suite (Wert was), CM/Track V3 (Wert track3) oder CM/Track V2 (Wert track) sein.
- oidc.<scope>.enabled.default: Gibt an, ob die Benutzerauthentifizierung mit SSO über OIDC aktiviert ist. Sollte "true" sein.
- oidc.<scope>.authority.default: Gibt die URL der Authentifizierungsautorität an, z. B. ADFS. Beispiel:
https://localhost/adfs - oidc.<scope>.clientId.default: Gibt die Client-ID (Anwendungs-ID) der Anwendung an, wie sie in ADFS oder Azure AD registriert ist.
- oidc.<scope>.clientSecret.default: Gibt das Secret des Clients an, das mit ADFS oder Azure AD generiert wurde.
- oidc.<scope>.globalLogout.default: Legt fest, ob der Benutzer auch beim OIDC-Provider abgemeldet wird, wenn er sich vom Client abmeldet. Bei einem externen Provider ist der Wert in der Regel "false", damit Sitzungen in anderen Anwendungen, die vom gleichen Provider bereitgestellt werden, nicht geschlossen werden. Nicht relevant für CM/Track V2.
- oidc.<scope>.providerType.default: Sollte "external" sein, um eine Anwendung eines Drittanbieters zu verwenden, wie Azure AD oder ADFS. Nicht relevant für CM/Track V2.
- oidc.<scope>.redirectUri.default: Gibt die Redirect-URI an, über die Authentifizierungsantworten empfangen werden können. Dies ist entweder der OIDC-Endpunkt auf dem ConSol CM-Server, auf dem der Client läuft, oder auf dem Load Balancer. Beispiel:
http://localhost/track/oidc/oderhttps://localhost/cm-client/oidc/ - oidc.<scope>.usernameClaim.default: Gibt den Namen des Claims im ID-Token an, der für die Zuordnung des Benutzers zu einem Benutzer oder Kontakt in ConSol CM verwendet wird. Der Wert hängt von den ADFS-Einstellungen ab; die Standardwerte sind "upn" und "unique_name".
- oidc.<scope>.usernameRegexp.default: Definiert den regulären Ausdruck, der für die Zuordnung der Benutzernamen-Claim-Werte zu ConSol CM-Benutzernamen verwendet wird.
upnals Claim:(.*)@.*wandelt den Claim-Wertuser1@sso.yourdomain.cominuser1um und sucht in der ConSol CM-Datenbank nachuser1.unique_nameals Claim:.*\(.*)wandelt den Claim-WertSSO\user1inuser1um und sucht in der ConSol CM-Datenbank nachuser1.
Erweiterte Aufgaben
Vornehmen von erweiterten Einstellungen
Im folgenden Abschnitt wird beschrieben, wie Sie erweiterte Einstellungen für die verschiedenen Quellen der Anmeldeinformationen vornehmen können.
- Database
- LDAP
- External SSO
Konfigurieren der Passwortrichtlinie
Sie können die Passwortrichtlinie in den folgenden System-Properties anpassen:
-
cmas-core-security, policy.password.pattern: RegEx-Muster für das Passwort. Standardwert:
^(?=.*[0-9])(?=.*[A-Z])(?=.*[a-z]).{7,}$(mindestens 7 Zeichen, mindestens ein Großbuchstabe, ein Kleinbuchstabe und eine Zahl) -
cmas-core-security, policy.password.age: Maximale Gültigkeitsdauer, in Tagen. Beispiel: 183 (6 Monate). Standardwert: 5500 (15 Jahre, d. h. keine Änderung des Passworts erzwungen).
-
cmas-core-security, policy.rotation.ratio: Anzahl der vorherigen Passwörter, die nicht identisch sein dürfen. Standardwert: 5.
-
cmas-core-security, policy.username.case.sensitive: Legt fest, ob beim Passwort zwischen Groß- und Kleinschreibung unterschieden wird. Standardwert: true.
MySQLDiese Einstellung wird von der MySQL-Collation beeinflusst und benötigt die richtige Collation, um korrekt in MySQL zu funktionieren.
Konfigurieren der Passwort-Zurücksetzung
Benutzer oder Kontakte, die ihr Passwort vergessen haben, können auf der Anmeldeseite auf den Link Passwort vergessen? klicken. Wenn ihre Daten eine E-Mail-Adresse enthalten, erhalten sie eine E-Mail mit Anweisungen, wie sie ihr Passwort zurücksetzen können.
Die folgenden Templates werden für die E-Mail verwendet. Sie können auf der Seite Templates der Web Admin Suite angepasst werden.
- Benutzer: auth-passwort-reset-template
- Kontakte: track-auth-passwort-zurücksetzen-template
Die folgenden Variablen werden in den Templates verwendet und müssen auf die richtigen Werte gesetzt werden:
- expirationDate: Standardmäßig läuft der Link 24 Tage nach der Anforderung zum Zurücksetzen des Passworts ab. Um diesen Wert zu ändern, erstellen Sie die System-Property
cmas-core-security,resetCode.expirationPeriodmit dem gewünschten Zeitraum. - urlTrackAuth: URL zur CM/Track-Instanz, die in der System-Property
cmas-core-server,url.track.authgespeichert ist. - urlWebclientAuth: URL zum Web-Client, die in der System-Property
cmas-core-server,url.webclient.authgespeichert ist.
Kontakte benötigen Schreibrechte für ihre eigene Kundengruppe, um ihre Passwörter zurückzusetzen.
Einrichten von LDAPS
Standardmäßig werden die Daten im Klartext übertragen, wenn ein LDAP-Client auf einen LDAP-Server zugreift. Wenn Sie möchten, dass der Benutzername und das Passwort verschlüsselt an den LDAP-Server übertragen werden, müssen Sie die LDAP-Authentifizierung mit LDAPS aufsetzen.
Sie müssen den Rechner des ConSol CM-Servers so konfigurieren, dass er Zertifikate verwenden kann. Eine Methode dafür ist im folgenden Abschnitt für einen Linux-Rechner beschrieben.
-
Rufen Sie das Zertifikat ab:
openssl s_client -connect dc2.mydomain.com:ldaps -
Die Antwort enthält einen Abschnitt, der mit
"---BEGIN CERTIFICATE "beginnt und mit"END CERTIFICATE ---"endet. Kopieren Sie diesen Abschnitt in eine Datei, z. B./tmp/certificate2_dc2_mydomain_com.txt -
Importieren Sie das Zertifikat in den Truststore des Rechners, z. B.
/home/mydirectory/mytruststore$JAVA_HOME/bin/keytool -import -alias <arbitrary> -trustcacerts -keystore /home/mydirectory/mytruststore -file/tmp/certificate2_dc2_mydomain_com.txtSie müssen ein Passwort eingeben (setzen).
-
Fügen Sie den Truststore in die ConSol CM-Konfigurationsdatei unter JAVA_OPTS ein:
-Djavax.net.ssl.trustStore=/home/mydirectory/mytruststore -Djavax.net.ssl.trustStorePassword=<see above>
Keine zusätzliche Konfiguration möglich.
Verwenden von Zwei-Faktor-Authentifizierung
Sie können die Zwei-Faktor-Authentifizierung als zusätzliche Sicherheitsmaßnahme aktivieren. Der zweite Faktor ist ein Einmalcode, der per E-Mail gesendet wird.
Der Anmeldevorgang mit Zwei-Faktor-Authentifizierung sieht wie folgt aus:
- Der Benutzer öffnet die Anmeldeseite und gibt seine Anmeldedaten (Benutzername und Passwort) ein.
- Wenn die Anmeldedaten korrekt sind, wird eine E-Mail mit einem Einmalcode verschickt.
- Der Benutzer gibt den Eimalcode ein, um sich anzumelden. Falls konfiguriert, kann er entscheiden, sich diesen Browser zu merken, sodass er innerhalb des konfigurierten Zeitraums nicht erneut zur Eingabe eines Einmalcodes aufgefordert wird.
Die Konfiguration erfolgt getrennt für die Authentifizierungsanwendung (Web Client und Web Admin Suite, Bereich user) und die Portal-Authentifizierungsanwendung (CM/Track V3, Bereich portal.user).
- cmas.auth.<scope>.2fa.mode: Setzen Sie "email", um die Zwei-Faktor-Authentifizierung zu aktivieren.
- cmas.auth.<scope>.2fa.email.code.length: Definieren Sie die Länge des Einmalcodes, der per E-Mail gesendet wird. Standardwert: 6.
- cmas.auth.<scope>.2fa.email.code.validity.minutes: Definieren Sie die Gültigkeit des Einmalcodes in Minuten. Standardwert: 15.
- cmas.auth.<scope>.2fa.rememberBrowser.enabled: Setzen Sie "true", um die Checkbox Dieses Gerät merken auf der Anmeldeseite anzuzeigen, wodurch die Benutzer den zweiten Faktor überspringen können.
- cmas.auth.<scope>.2fa.rememberBrowser.period.days: Definieren Sie den Zeitraum für das Merken des Browsers.
- cmas.auth.<scope>.2fa.rememberBrowser.key: Definieren Sie den Schlüssel zur Identifizierung der Token für das Merken des Browsers.
- cmas.auth.<scope>.2fa.whitelist: Definieren Sie, welche Benutzer die Zwei-Faktor-Authentifizierung überspringen können, indem Sie ihre Logins als kommagetrennte Liste hinzufügen.
- cmas.auth.user.2fa.scope: Setzen Sie diesen Wert auf "admin", wenn die Zwei-Faktor-Authentifizierung nur für Benutzer mit Administratorrechten erforderlich sein soll. Setzen Sie den Wert auf "all", wenn die Zwei-Faktor-Authentifizierung für alle Benutzer aktiviert werden soll. Nur für den Web Client und die Web Admin Suite.
Sie können die E-Mail, die mit dem Einmalcode gesendet wird, in den folgenden Templates auf der Seite Templates der Web Admin Suite anpassen:
- track-auth-2fa-mailcode-template: Template für CM/Track V3
- auth-2fa-mailcode-template: Template für den Web Client und die Web Admin Suite
Zwei-Faktor-Authentifizierung ist nicht verfügbar, wenn ein externer SSO-Provider genutzt wird. In dieser Situation werden alle auf der ConSol CM-Seite vorgenommenen Einstellungen bezüglich Zwei-Faktor-Authentifizierung ignoriert, und Sie müssen einen zweiten Faktor in der externen SSO-Anwendung konfigurieren.
Die Funktion Browser merken ist nur über HTTPS oder auf localhost verfügbar, da sichere Cookies verwendet werden.
Überprüfen der internen OIDC-Konfiguration
Sie können die OIDC-Konfiguration auf der Seite System-Properties überprüfen. Die folgenden Properties im Modul cmas-core-security sind relevant.
Der Platzhalter <scope> wird in den Property-Namen für den Client verwendet, für den die OIDC-Konfiguration relevant ist. Dies kann der Web Client (Wert web), die Web Admin Suite (Wert was) oder CM/Track V3 (Wert track3) sein.
- oidc.<scope>.enabled.default: Gibt an, ob die Benutzerauthentifizierung mit SSO über OIDC aktiviert ist. Sollte "true" sein.
- oidc.<scope>.authority.default: Gibt die URL der Authentifizierungsautorität an. Sollte "cmas-auth-user" für Web Client und Web Admin Suite und "cmas-auth-portal-user" für CM/Track sein. Beispiel:
https://localhost/cmas-auth-user. - oidc.<scope>.clientId.default: Gibt die ID des Clients an. Muss in der Standardkonfiguration nicht geändert werden.
- oidc.<scope>.clientSecret.default: Gibt das Secret des Clients an. Muss in der Standardeinstellung nicht geändert werden.
- oidc.<scope>.globalLogout.default: Legt fest, ob der Benutzer auch beim OIDC-Provider abgemeldet wird, wenn er sich vom Client abmeldet. Sollte auf "true" gesetzt werden.
- oidc.<scope>.providerType.default: Sollte "internal" sein, um die ConSol CM-Authentifizierungsanwendung als OIDC-Provider zu verwenden.
- oidc.<scope>.redirectUri.default: Gibt die Redirect-URI an, über die Authentifizierungsantworten empfangen werden können. Dies ist entweder der OIDC-Endpunkt auf dem ConSol CM-Server, auf dem der Client läuft, oder auf dem Load Balancer. Beispiel:
https://localhost/track/oidc/oderhttps://localhost/cm-client/oidc/ - oidc.<scope>.usernameClaim.default: Gibt den Namen des Claims im ID-Token an, der für die Zuordnung des Benutzers zu einem Benutzer oder Kontakt in ConSol CM verwendet wird. Sollte "sub" sein.
- oidc.<scope>.usernameRegexp.default: Definiert den regulären Ausdruck, der für die Zuordnung der Claim-Werte für den Benutzernamen zu ConSol CM-Benutzernamen verwendet wird. Sollte
(.*)sein.
Verwenden von mehreren URLs für CM/Track
Wenn über mehr als eine URL auf CM/Track zugegriffen wird, müssen Sie zusätzliche OIDC-Konfigurationen erstellen. Dies ist zum Beispiel in den folgenden Situationen der Fall:
- Es gibt zwei verschiedene Instanzen von CM/Track für verschiedene Gruppen von Endbenutzern.
- Auf eine Instanz von CM/Track wird über zwei verschiedene URLs zugegriffen, z.B. eine interne und eine externe.
Für jede URL, die für den Zugriff auf CM/Track verwendet wird, ist eine OIDC-Konfiguration erforderlich. Sie muss manuell auf der Seite System-Properties erstellt werden. Die folgenden Änderungen sind notwendig:
- Fügen Sie alle URLs, die die Portalkonfiguration verwenden sollen, als kommagetrennte Liste zur System-Property
cmas-restapi-core,domain.map.for.client.config.\{portal_config\}hinzu, z.B.domain.map.for.client.config.MYPORTAL=http://cm.consol.pl:8999/cm-track, http://cm.consol.pl/cm-track. - Erstellen Sie für jede URL eine OIDC-Konfiguration. Sie muss mindestens die folgenden Properties enthalten:
- Erstellen Sie
cmas-core-security,domain.map.for.oidc.config.\{oidc_config\}und setzen Sie die URL, über die CM/Track erreicht wird, als Wert, z.B.domain.map.for.oidc.config.MYTRACK1=http://cm.consol.pl:8999/cm-track. - Erstellen Sie
cmas-core-security,oidc.track3.redirectUri.\{oidc_config\}und setzen Sie den/oidc-Endpunkt der CM/Track-Instanz als Wert, z.B.oidc.track3.redirectUri.MYTRACK1=http://cm.consol.pl:8999/cm-track/oidc/. - Erstellen Sie
cmas-core-security,oidc.track3.authority.\{oidc_config\}und setzen Sie den Endpunkt/cmas-auth-portal-userder Authentifizierungsanwendung als Wert, z. B.oidc.track3.authority.MYTRACK1=http://cm.consol.pl:8999/cmas-auth-portal-user.
- Erstellen Sie
- Überprüfen Sie die Standard-OIDC-Konfiguration, siehe Überprüfen der internen OIDC-Konfiguration. Wenn andere Werte benötigt werden, erstellen Sie konfigurationsspezifische Properties, um die Standardwerte zu überschreiben, z. B.
oidc.track3.authority.MYTRACK1.