GUI of the Web Admin Suite
You can access the Web Admin Suite in your browser by appending /was to the system URL, e.g. https://mycmserver/was.
Dashboard
The dashboard is shown when first opening the Web Admin Suite or when clicking the Web Admin Suite logo in the upper left corner of the screen. It shows general system information and an overview of the system status.
- Overall system information: Shows general system information as the installed version of ConSol CM, the Java version of the application server and the number of available and used licenses.
- Global statistics: Shows the used/available memory and average CPU load of the machine where the application server runs.
- JVM statistics: Shows the memory usage of the Java Virtual Machine belonging to the ConSol CM server and the Java properties which are passed in the command to start the ConSol CM server (e.g. properties related to the application server, the memory allocation, etc.).
- Component status: Shows the status of different ConSol CM components. You can click Details for further information. The information is retrieved from the monitoring endpoints
<CM URL>/health/checkand<CM URL>/health/report, see Monitoring.- Database: Shows the version and status of the ConSol CM database (
cmas-core-dao-hibernate-defaultattribute of the monitoring endpoint). - Workflow engine: Shows information about job execution (
cmas-core-server-workflowattribute of the monitoring endpoint). - Data Warehouse: Shows information about the status and content of the DWH (
cmas-dwh-engineattribute of the monitoring endpoint). - Email receiver: Shows information about the status of the NIMH subsystem which handles incoming emails (
cmas-nimh-engineattribute of the monitoring endpoint). - General: Shows general information about the system and the status of the email subsystem which handles outgoing emails (
cmas-core-server-defaultattribute of the monitoring endpoint). - Authentication protection: Shows information about the status and settings of the authentication protection feature (
cmas-core-server-brute-force-protectionattribute of the monitoring endpoint), see TODO.
- Database: Shows the version and status of the ConSol CM database (
- Metrics: Shows metrics about the ConSol CM system
- Failed authentication attempts in the last hour: Shows the number of failed authentication attempts in the last hour, see TODO.
- Quick access: Shows the last visited pages, frequently visited pages, and recent changes (only changes to users, roles, views, enums, scripts, templates, workflows, field groups, queues, customer groups and contact models).
If you experience problem with loading the dashboard when running ConSol CM as a service under a user without administrator permissions on Windows, you can set the system property healthcheck.system.statistics.enabled from the module cmas-core-server to false to skip metrics about the status of the underlying machine and operating system.
Structure of the screen
The GUI of the Web Admin Suite is divided into three parts: the header at the top, the menu bar on the left, and the main panel.
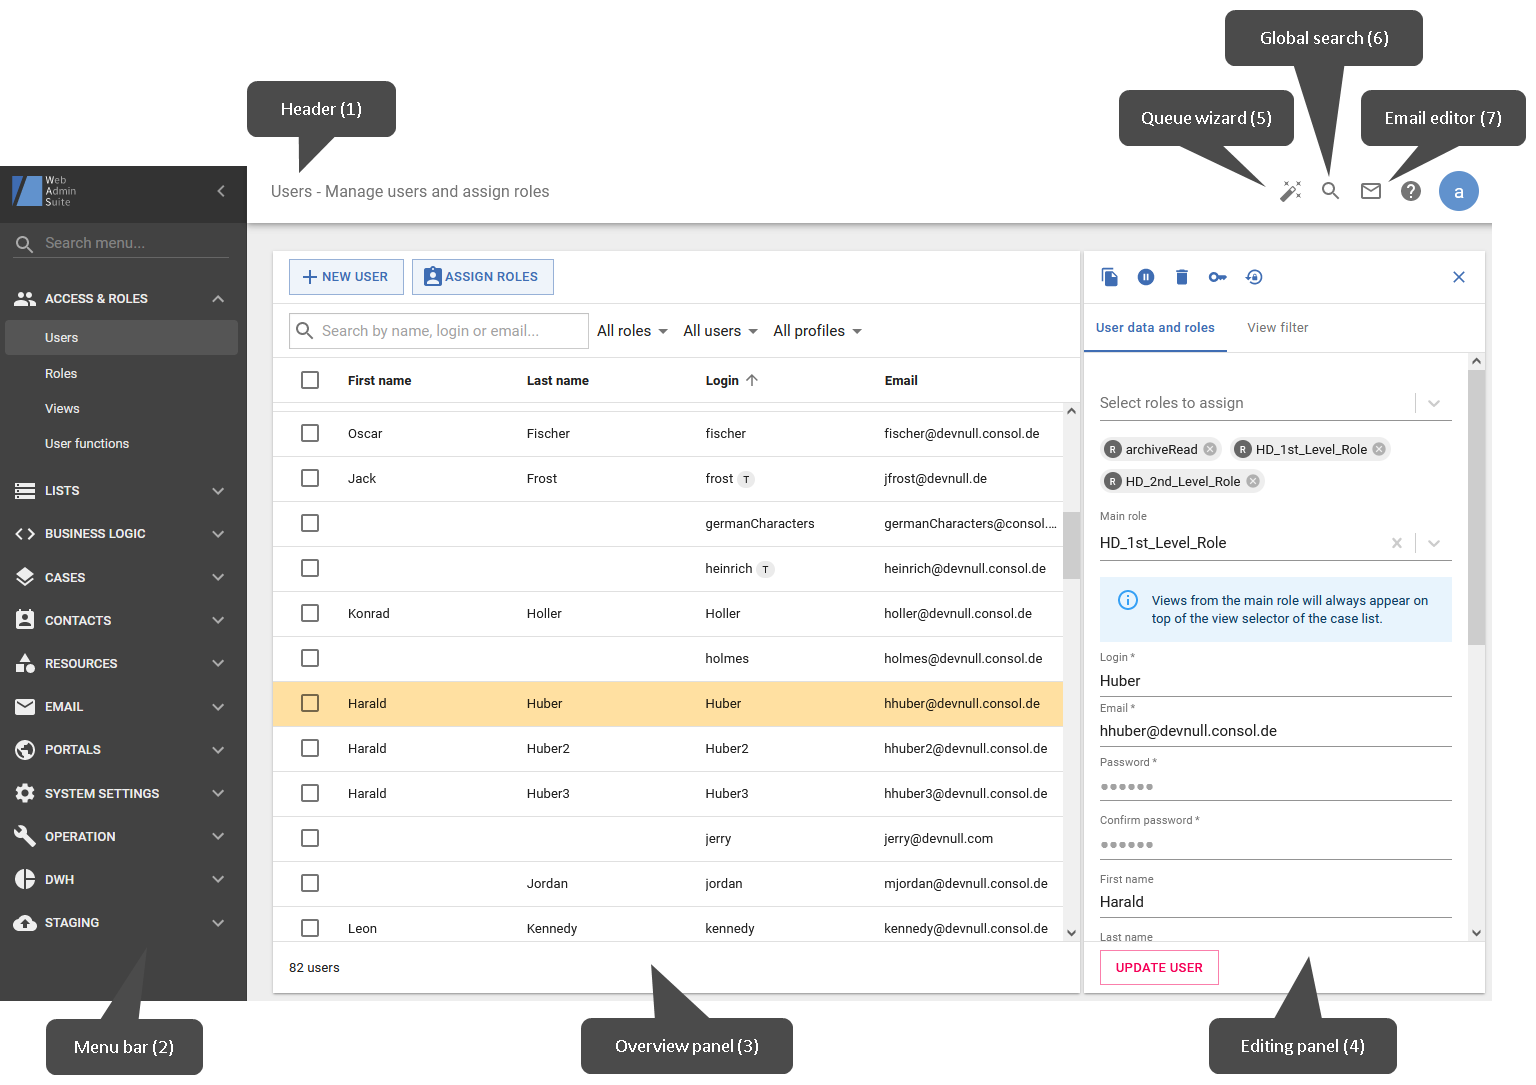
The header (1) contains the following information:
- Name of the current page
- Help icon (question mark) which provides a link to the online help page of the current page
- User settings and logout (circle with the first letter of the name of the current user)
If a name and type are set for the system (see system properties system.name and system.flavour), the header is colored according to the type, and the name and type are shown next to the help icon.
The menu bar (2) contains the links to the Web Admin Suite screens grouped by area. The search field at the top allows to filter the menu items. A dashboard and eleven groups are available:
- Dashboard: View general system information and an overview of the system status. Start page, also accessible using the Web Admin Suite icon in the header.
- Access & roles: Manage users and user functions as well as their roles in the system. Create and assign views for the Web Client.
- Lists: Lists contain predefined sets of values. There are enumerated lists, hierarchical lists and address autocomplete. After a list has been defined, it can be used in case, contact and resource fields.
- Business logic: Here you can find the logic behind the processes in the ConSol CM system: scripts, templates and workflows. The business processes are defined and adapted here.
- Cases: Cases represent customer requests of contacts. In this section you can define the data model for cases in ConSol CM.
- Contacts: Contacts are persons who are normally assigned to cases in ConSol CM. The data model for contacts in the ConSol CM system can be defined here.
- Resources: Resources are additional objects, which can be used in business processes. The data model for resources in the ConSol CM system can be defined here.
- Email: Configure and manage the email functions of the ConSol CM system for the communication between contacts and users.
- Web Client: Make settings for the Web Client, such as GUI texts and dashboards.
- Portals: Create configurations for CM/Track V3 and review global portal settings.
- System settings: This section contains global settings and configurations for the ConSol CM system.
- Operation: This section describes all elements which are required to operate the ConSol CM system, e.g. log files and indexes.
- DWH: The data warehouse is a separate database which contains certain data from ConSol CM in a data model tailored specifically for reporting and data analysis purposes. The DWH component is configured and managed in this section.
- Staging: This section includes features for transferring data between ConSol CM systems, and between ConSol CM and external systems.
You can collapse the menu bar by clicking the arrow icon in its header. To expand it again, click the icon with the three horizontal lines in the header. If you click the icon of a group, a menu where you can select one of the group’s pages opens.
You work in the main panel (3 and 4). Its content depends on the selected menu item and the current action. Usually, an overview panel (3) which spans the whole width of the main panel is displayed when you select a menu item. When you click an item to work on it, the main panel is split and an editing panel (4) is displayed on the right. You can close the editing panel by clicking the X icon in the upper right corner. If you want to edit another item, you can also select it directly in the overview panel. The content of the editing panel changes accordingly.
The following additional features are available in the header:
- Queue wizard (5): Helps you to get started with the configuration of the system. It guides you through the creation of all items which are required to obtain a working queue, i.e. workflow, case field group, customer group based on contact model with default fields, role, view and a first user with access to the queue. Alternatively, you can choose existing items for your queue, e.g. if you already have a workflow or contact model.
- Global search (6): Allows to search for any configuration item in the Web Admin Suite. The search results are grouped by page. You can open found entities by clicking their chip icon.
- Email editor (7): Allows you to write an email to ConSol CM users. You need to select one or several roles to identify the users who should receive the email, and enter a subject and email text. Optionally, you can select a template of the type Email to prefill the email text.
Icons
The Web Admin Suite uses icons for certain actions. You can hover over the icon to see a tooltip with a description.
Icons can appear in several situations:
- When loading the page: The action is not related to a specific item.
- In the header of the details panel: The action is applied to the open item.
- When hovering an item: The action is applied to this item. You can also right-click the item to select the action from the context menu.
- When selecting checkboxes: The action is applied to all selected items in the table. Items for which the action cannot be executed are skipped.
User settings
You can customize the Web Admin Suite in several ways:
- Mark sorted lists, workflows, case fields, contact fields or resource fields as favorites to display them in the Favorites menu and at the top of their tables.
- Define your preferred display of scripts and log files in regard to line wrapping (scripts and log files), order and refresh interval (only log files). The settings are global and can be made either on the Scripts and Log files pages or in the Settings dialog, which can be opened by clicking the Settings option in the menu of the user avatar.
Behavior of the Web Admin Suite
When do actions take effect?
There are three possible ways how actions take effect in the Web Admin Suite:
- There is a button to confirm the action. Usually, the button is inactive at first, when you have not made any changes yet. It becomes available as soon as you make changes. You can click the button to confirm your action.
- The action takes effect immediately. This behavior applies to some settings where confirming each individual action would be cumbersome, e.g., sorting items in a list or assigning permissions. You do not need to confirm your action, but you should remember that you cannot undo it.
- A warning message is displayed to confirm the action. This is the default behavior for actions which delete items. You can confirm the warning message to perform the action.
Can several users work simultaneously?
Several users can work with the Web Admin Suite at the same time. If you work in an area where another user has made a change simultaneously, a red banner is displayed at the top of the page, and you need to reload the page to receive the changes made by the other user. Scripts are reloaded automatically in the background. If someone else saves the script which you are currently working on, a red warning message is displayed above the editor, and you can compare your changes with the new server version of the script, see TODO.
How does the search work?
The search in tables, transfer lists and selectors works as follows:
- If you enter one search term, which might include punctuation marks, all occurrences which contain the exact string are found. For example, a search for cm_customer will find cm_customer_new but not cmcustomer.
- If you enter several search terms separated by spaces, all occurrences which contain all search terms are found. It does not matter if the terms are present in this order or separated by spaces or punctuation marks in the result. For example, a search for cm customer will find cm_customer, cmcustomer and customerCm.
Search is always case-insensitive.
How do table columns behave?
When opening a page, the table usually spans the whole width and contains several columns. You can modify the displayed table columns by clicking the Column selector icon located in the top right corner of the table and selecting the desired columns. In addition, you can change the column width by clicking the plus or minus icon in the column selector.
Once you click a table row, the details panel is opened on the right and all columns except for the internal name are hidden. If the elements have localized names, you can click the Change column icon in the column header to switch the displayed column, e.g. display the English localizations instead of the internal names. If the localized name is empty for an element, the following syntax is used: (empty) (internal name)
Keyboard shortcuts
- Search: Press the f key to place the cursor in the search field. If there is more than one search field on the page, the field of the table where the mouse cursor is located is focused.
- Confirm action: Press the enter key to confirm the current action, e.g. update an object or confirm a warning message. The enter key activates the primary button in pink. On the Sorted lists page, you can press shift + enter to create the next list value.
- Cancel action: Press the escape key to close a modal window without saving changes or confirming the action. The escape key activates the Cancel button.
There are additional shortcuts for the script and template editor.